Integration Hub : User Documentation
The following documentation will provide you with the information you need to use much. Integration Hub. The objective is to get you familiarised with the module by providing relevant information as to the main business processes it covers, and how you can configure it to best suits your needs.
Do you need support with our module? Open a ticket
Install iHub
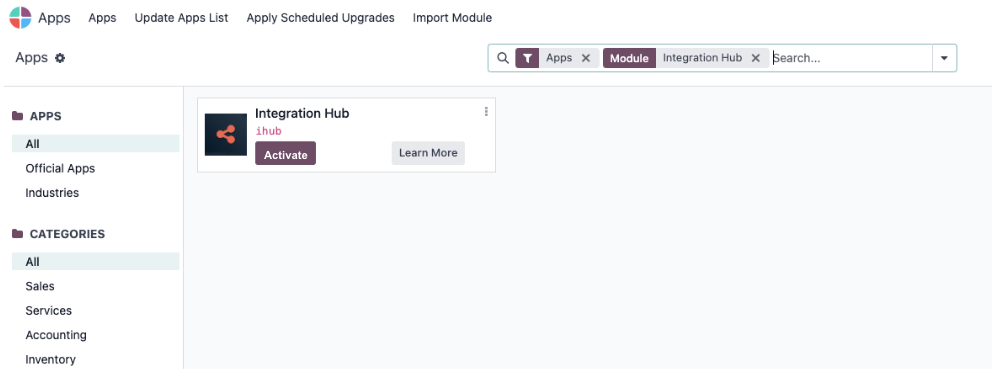
- Go to Odoo > Apps and search for Integration Hub
- Click Activate
Install integrations in iHub
- Go to Odoo > Apps and search for the much. integration you want to install. ex: Shopify
- Click Activate
- Go to Integration Hub > Integrations and click New
- Add an integration name
- In the Integration Type field, select the integration you just activated.
- In the Company field, select the Odoo company that this integration will be applied to.
- Click Save.
At this stage, the integration you just installed is set as Inactive. To enable the integration, you must go to the Integration Settings and fill out the API credentials of the system you want to connect. For detailed steps, refer to the integration's user documentation.

Activate and configure Scheduled Actions (Jobs)
After installing an integration in iHub, the related scheduled actions will be shown under the Jobs tab. You can access it by clicking on the Scheduled Actions smart button within an integration, or by clicking on Jobs > Cron Jobs in the top navigation bar.
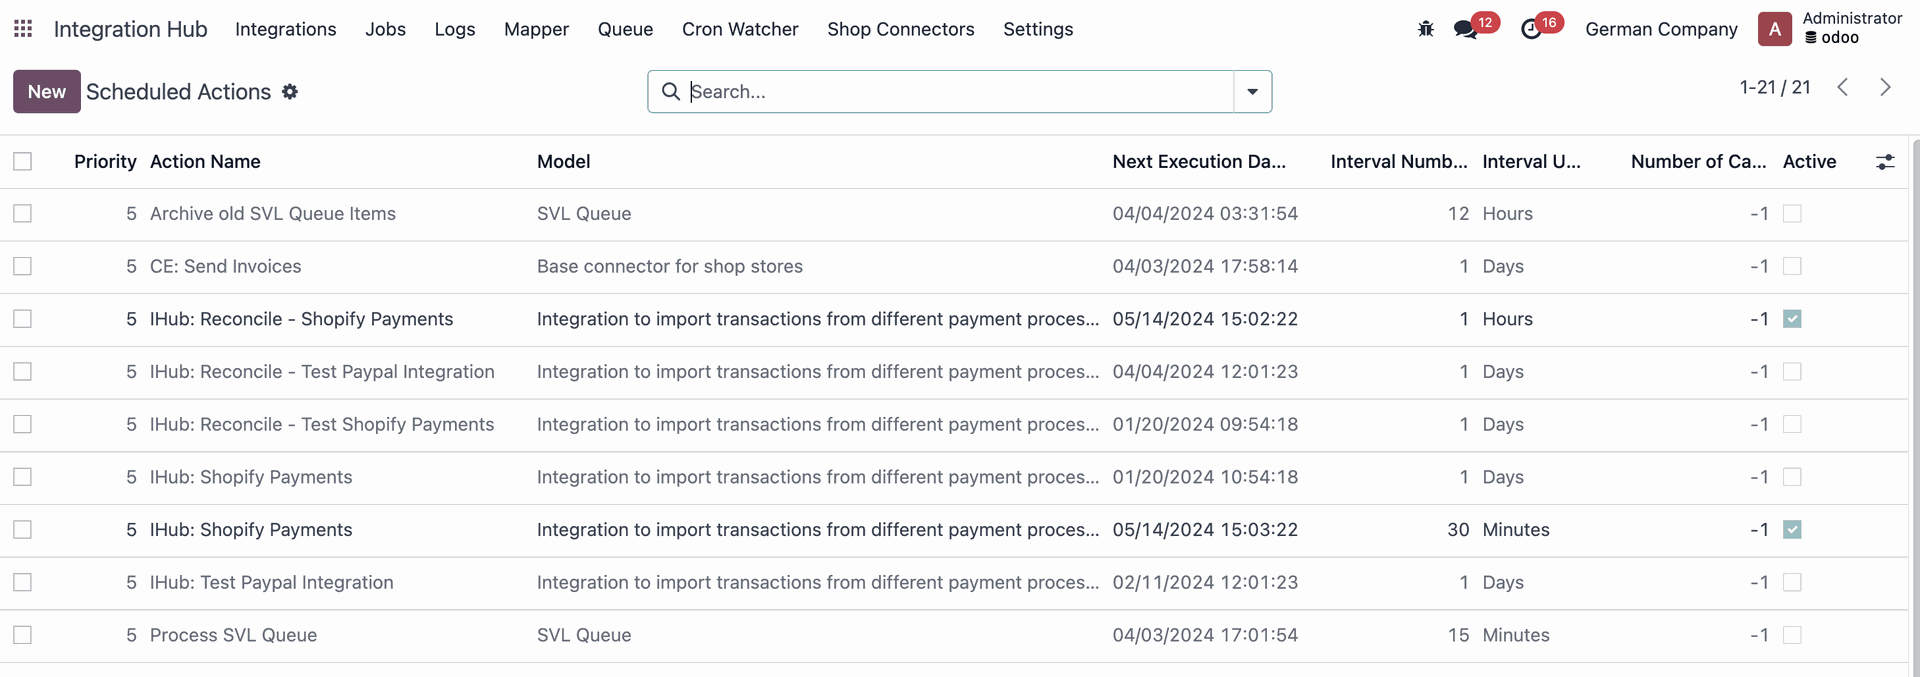
Scheduled Actions Configuration
When opening an Action, you can configure the following settings :
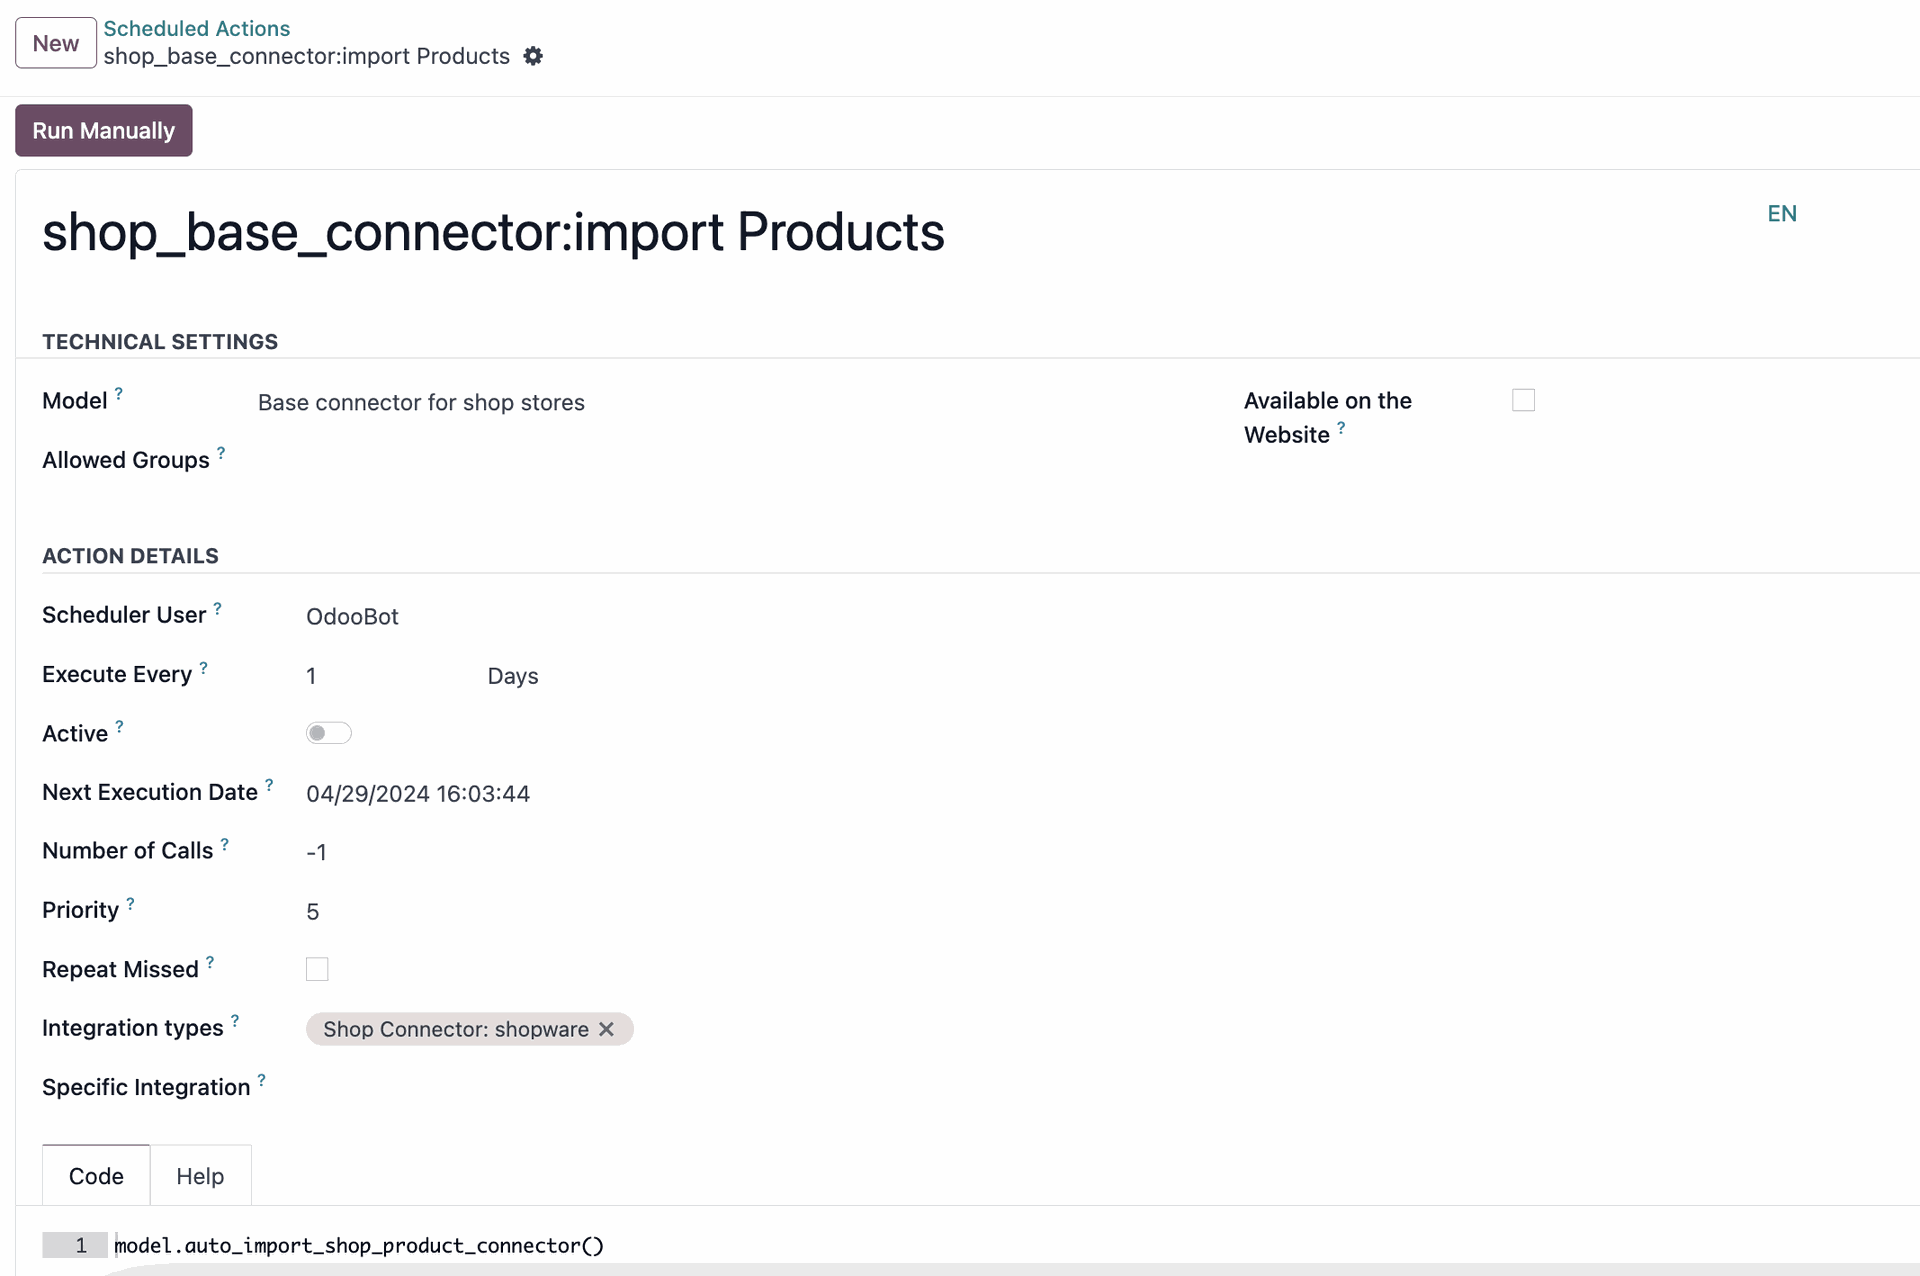
- Model : Odoo model
- Allowed Groups : select the users that can access and edit the scheduled action settings
- Scheduler User : specific user or user types that can access and edit the scheduled action settings
- Execute Every : choose the time after which the action should run again.
- Active : toggle to activate or deactivate an action.
- Next Execution Date : the next time the action will be triggered, calculated from the last execution date + execute every.
- Number of Calls : Number of times the method related to the action should be called. -1 indicates no limit.
- Priority : if actions are scheduled at the same time, decide the order in which actions should be triggered from 0 (higher priority) to 10 (lower priority)
- Repeat Missed : if a scheduled action is skipped due to server inactivity, choose to repeat the action when the server restarts.
- Integration types : select integration types that will trigger this scheduled action
- Specific integration : within an integration type, choose which specific integration will trigger this scheduled action
Custom Cron Jobs Parameters
IHub allows you to further customise scheduled actions based on your needs. You can create custom parameters for your scheduled actions, which will then appear in the Action form as seen in the section above.

To create a custom cron job parameter :
- Go to Jobs > Custom Cron Jobs Parameters and click New
- Cron Job : select the action to which this custom parameter will apply to.
- Integration : select the integration this customer parameter will apply to.
- Function Parameters : set the function parameter dictionary (e.g., {"parameter_1": "hardcoded_value"}) to be used in the selected cron job and integration.
Activate and configure Logs
Logs help you track the status of the data imports and exports happening between Odoo and the integrated system.
To activate Logs, go to Integration Hub > Settings > Event Logs and select the IHub Logs checkbox.
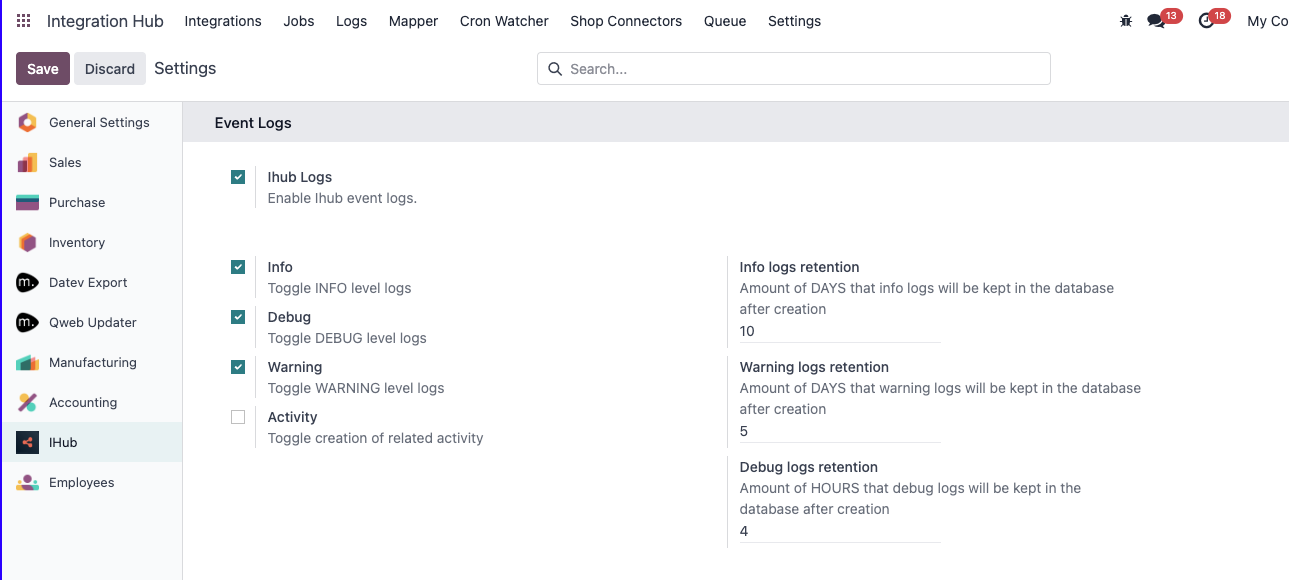
You can now configure what types of logs event you want to track in the Logs.
- Info logs : indicate a successful date exchange
- Debug logs : indicate an unsuccessful data exchange
- Warning logs : inform that something unexpected but not critical happened.
- Activity logs : creates an activity if an object was not created due to an error or critical log, if that object was supposed to trigger an activity when created.
Once your logs are configured, and data starts going in and out of Odoo, you can access the Logs in the Integration Hub navigation menu.

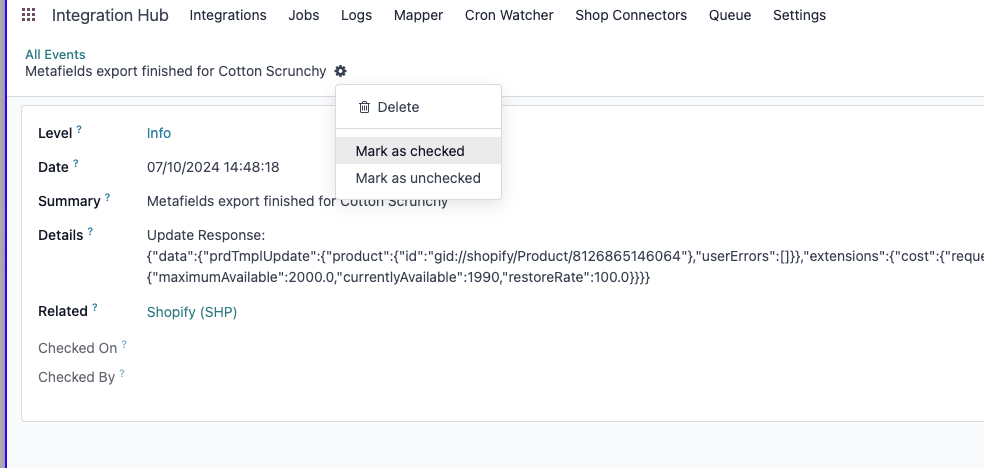
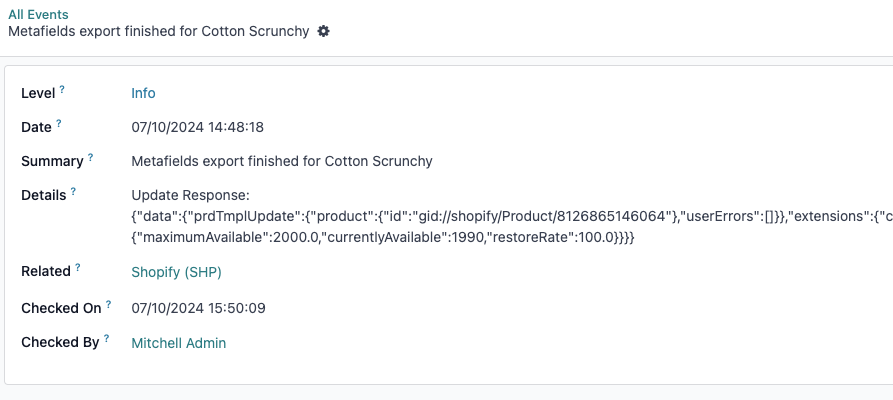
To ensure traceability, logs are created with the status "Non checked".
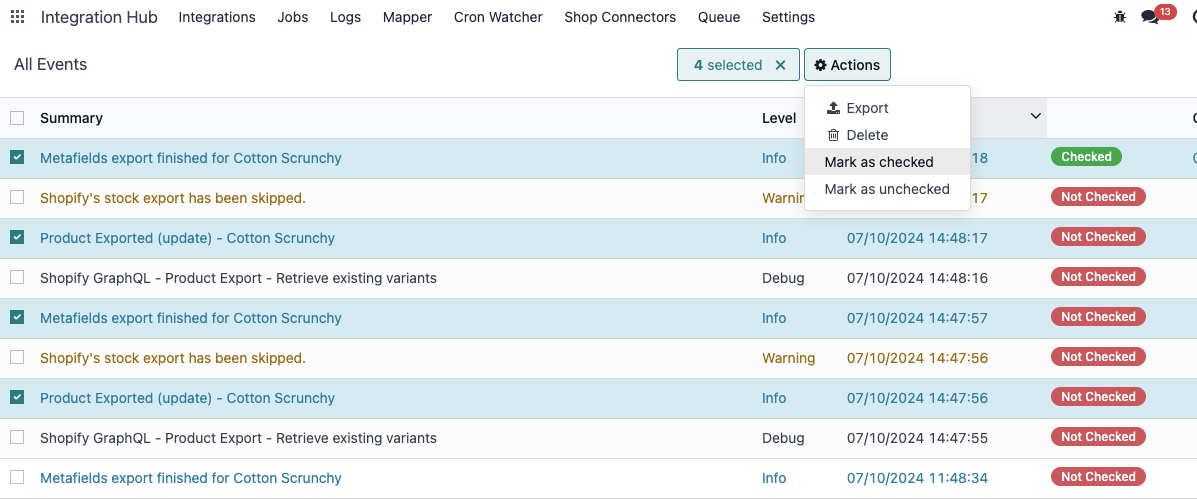
Once a log is reviewed, it can be marked as checked by clicking on the log > Actions > Mark as checked.
This will log the name of the reviewer and the date :
Activate and configure Mappers
Mappers are used in integrations to associate an Odoo value to it's corresponding value in the 3rd party system you are integrating with.
To activate Mappers, go to Integration Hub > Settings > Mappers and select the IHub Mappers checkbox.
Mappers are defined by Mapper types and Mapper items.
Mapper type
Mapper types are used to specify which Odoo model and field are going to be impacted by the mapper item.
Mapper Types contains the following information:
- Name (A)
- Type: Model or Enum (= enumeration) (B)
- Model: Odoo Model (C)
- Field: Odoo field (D)
You have also two settings (E) that define the behaviour of mappings on Import and Export when the value is unknown:
- Automatic: Mapper items will be created and complete.
- Fail: Mapper item will not be created. Fail on import.
- Manual: Mapper item will be created, the external value will be filled but not the odoo value.
Mapper items
A mapper item is created for each value from your 3rd party system that need to be mapped to a value in Odoo.
Mapper Items contains the following information :
- Name (A)
- Type: Mapper Types (B)
- Value Type (C): Single or Multiple
- External value & External ID (D)
- Odoo Model Value & ID (E)
and the option to update the respective mapper’s model values.
iHub Custom Fields
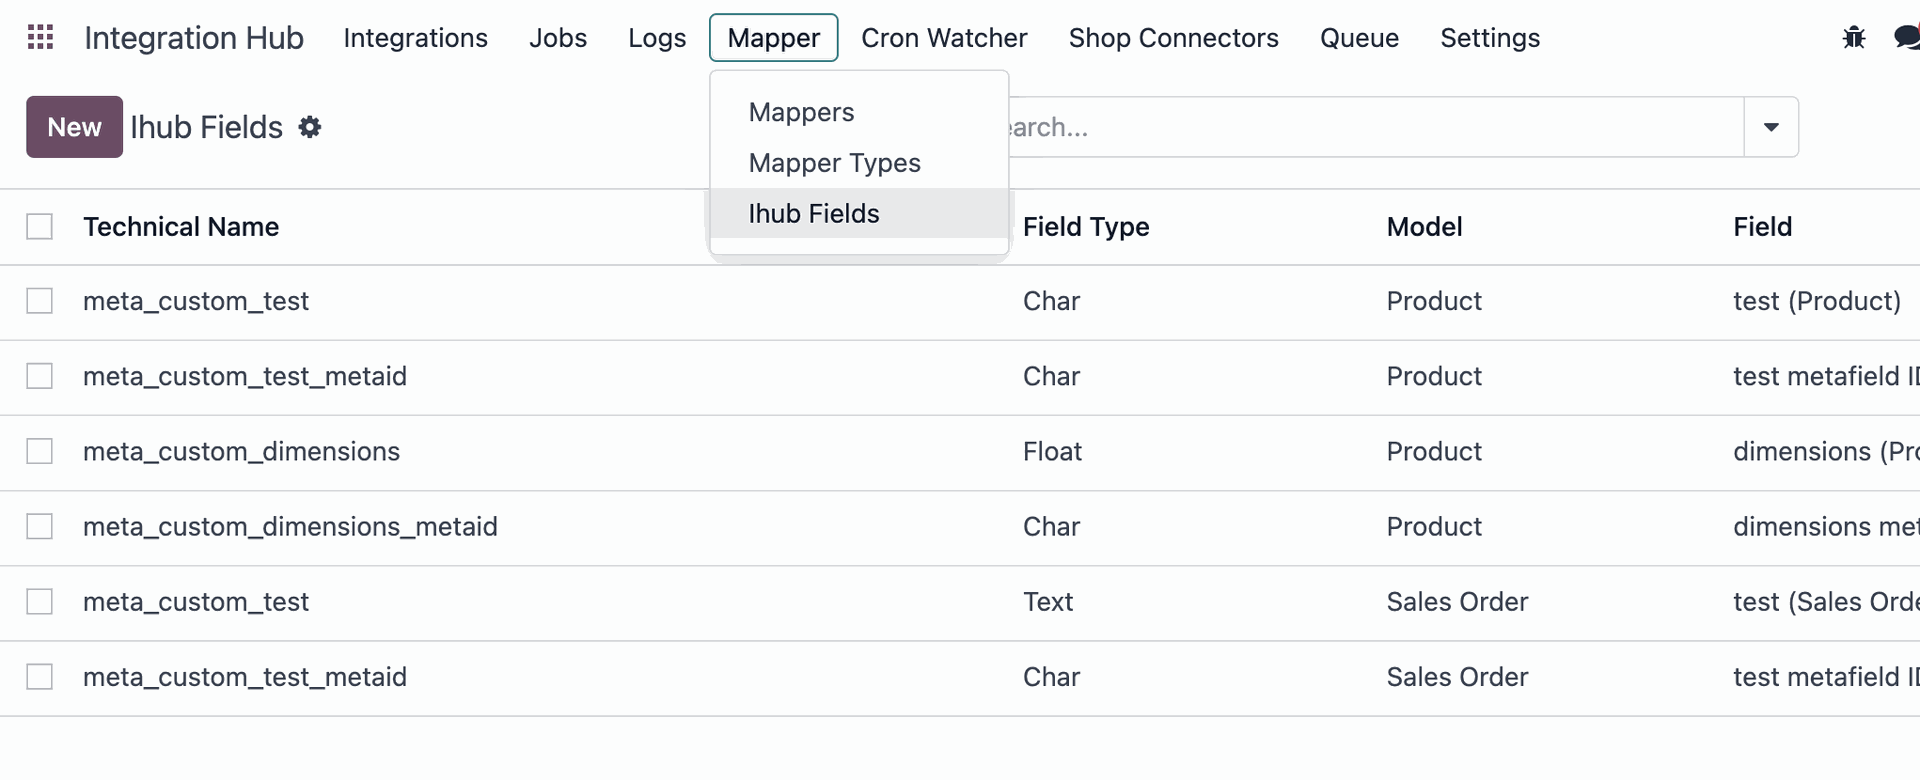
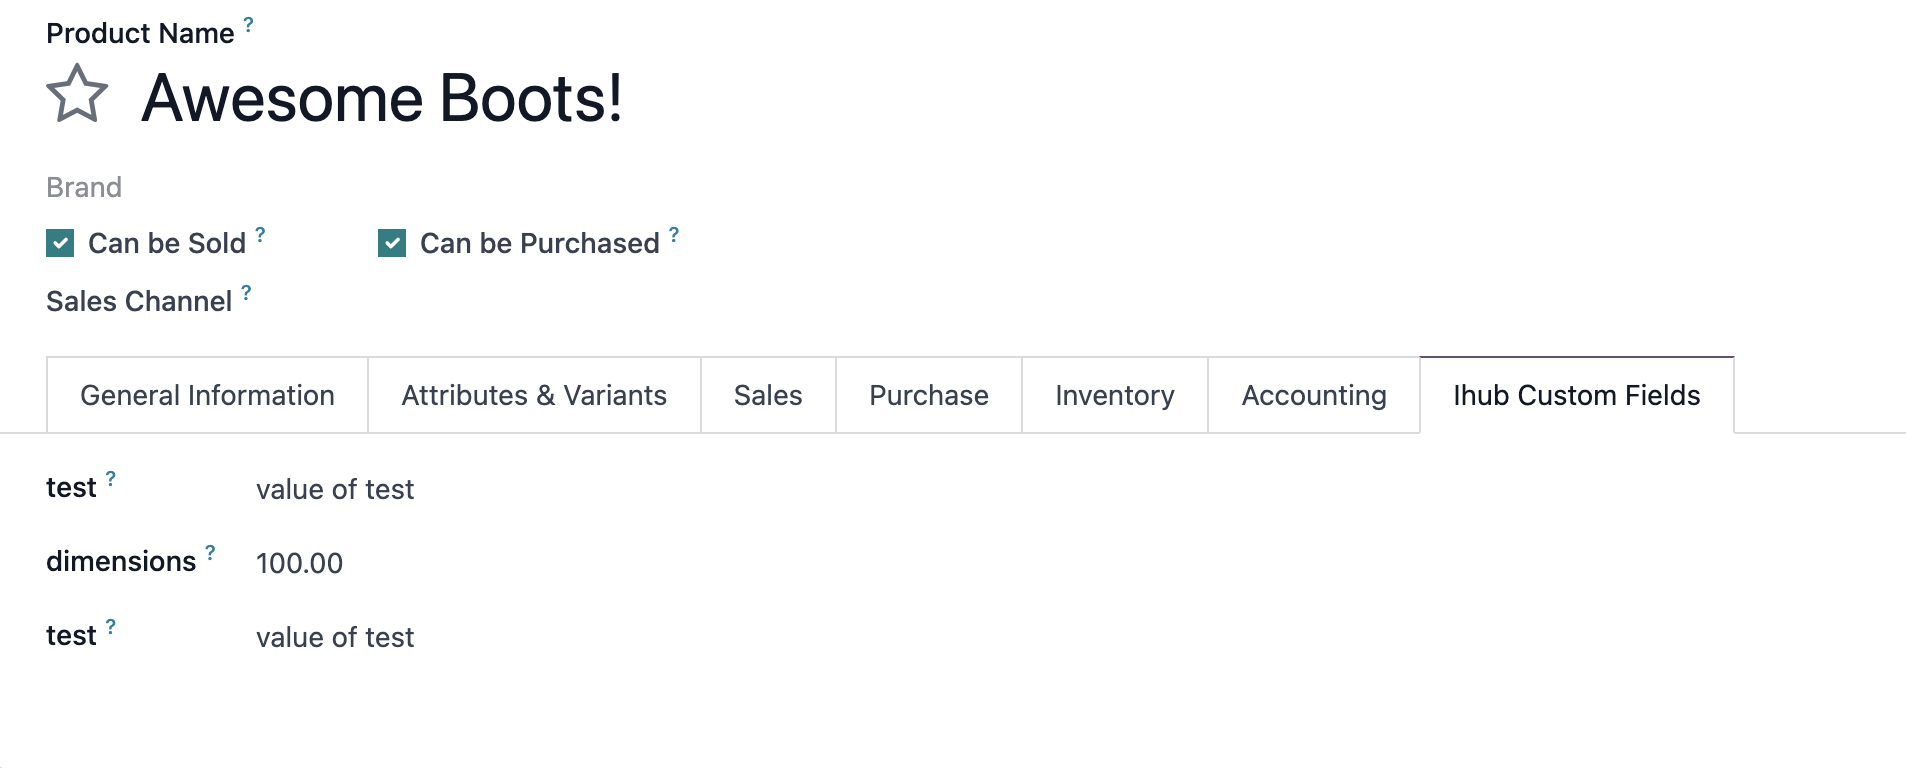
IHub allows you to create custom fields in any Odoo model, to match with a custom field you might use in a 3rd party system.
For example, if you use custom fields for Products in Shopify, IHub allows you to create that same property in the Product form in Odoo.
In some integrations, custom fields are created automatically. If you want to manually create custom fields, you need to:
- Navigate to Integration Hub > Mappers > Ihub Fields and click New.
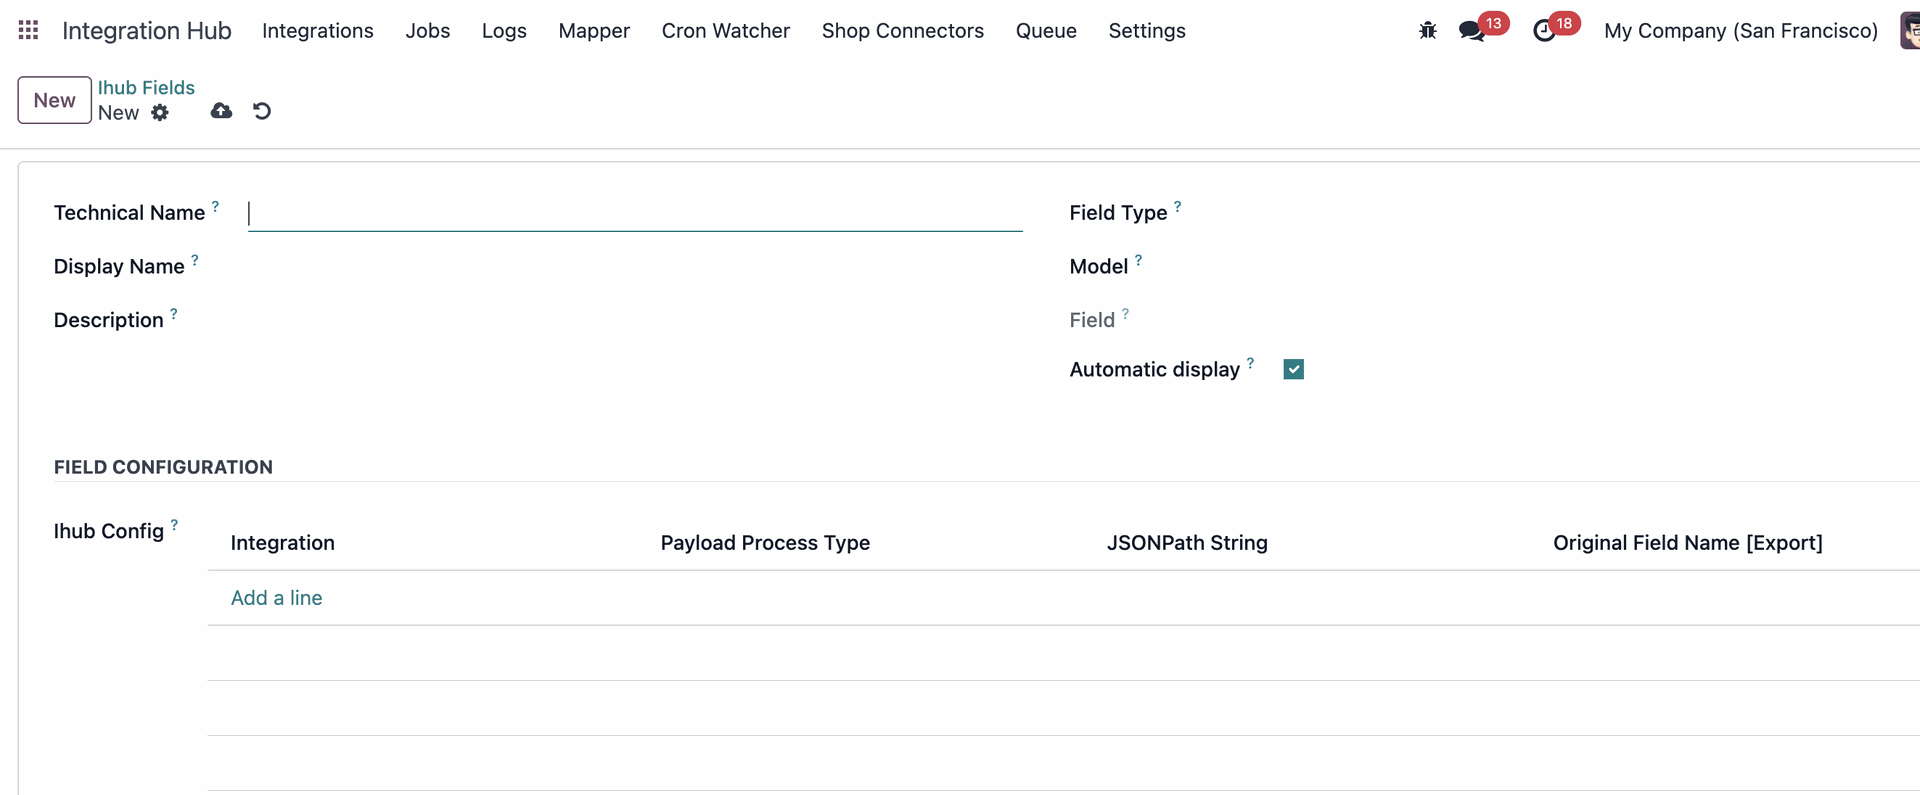
- In the new custom field form, fill the following information :
- Technical Name: field technical name, relevant for development (only visible in debug mode)
- Display Name: field display name, which the user can see.
- Description: tooltip field description (?)
- Field Type: indicates which type and characteristics your field needs.
- Boolean: A field that can be either true (checked) or false (unchecked).
- Char: A text field for short strings, like names or titles.
- Float: A field for numbers that can have decimals, like weights or prices.
- Integer: A field for whole numbers, like quantities or counts.
- Selection: A dropdown list of pre-defined choices.
- Date: A field to select a specific day, month, and year.
- Datetime: A field to specify a precise date and time.
- Model: where do you want this newly created field to appear.
- Field: The user cannot fill this out, it will automatically be filled out from the systems side which will lead to the technical setting/information of the newly created field.
- Automatic Display: Choose if you want to display it on the model or not
- Ihub Config: Integrations where you want to export your new field to. This is for an engineer to fill out.
Activate and configure Queue
Whenever data is received from an integration, there might be use-cases where we don't want to process the received items right away. The queue module allows to keep track of these pending items and process them later, either automatically or manually.
To activate the iHub queue feature, go to Integration Hub > Settings > Queue and select the IHub Queue checkbox.

Once items are received in the queue, you have the ability to process them manually or wait for the Execution Time.

