Integration Hub : User Documentation
The following documentation will provide you with the information you need to use much. Integration Hub. The objective is to get you familiarised with the module by providing relevant information as to the main business processes it covers, and how you can configure it to best suits your needs.
Do you need support with our module? Open a ticket
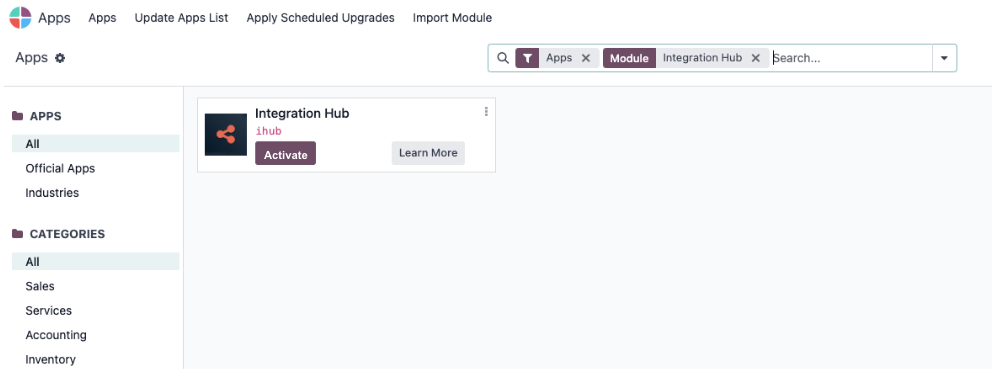
Install iHub
- Go to Odoo > Apps and search for Integration Hub
- Click Activate
Install integrations in iHub
- Go to Odoo > Apps and search for the much. integration you want to install. ex: Shopify
- Click Activate
- Go to Integration Hub > Integrations and click New
- Add an integration name
- In the Integration Type field, select the integration you just activated.
- In the Company field, select the Odoo company that this integration will be applied to.
- Click Save.
At this stage the integration is set as Inactive. To enable it, go to the Integration Settings tab and fill in the API credentials of the system you want to connect. For detailed steps, refer to the integration's own user documentation.
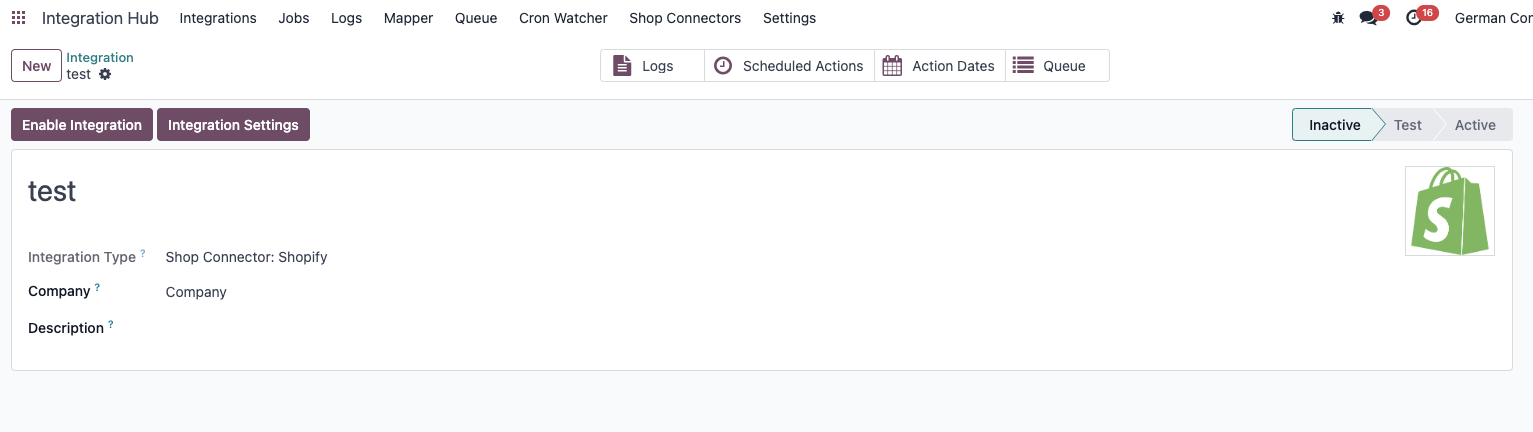
Integration Lifecycle: Inactive, Staging, and Active
Every integration moves through three states. Understanding these states ensures you can safely test a connection before it starts processing real data.
- Inactive — The integration has been created but is not yet configured or running. No scheduled actions are triggered and no data is exchanged.
- Test — The integration is ready to be used on an Odoo staging environment. This state allows you to verify credentials, test scheduled actions, and check logs without affecting production data.
- Active — The integration is connected to the production environment. Scheduled actions run normally and real data flows between Odoo and the external system.
To move an integration from Inactive to Staging or Active, fill in the required credentials in the Integration Settings tab and click Enable Integration. iHub automatically detects whether your Odoo instance is a staging or production environment and sets the integration state accordingly.
⚠️ An integration that is Active cannot be deleted. Disable it first before removing it.
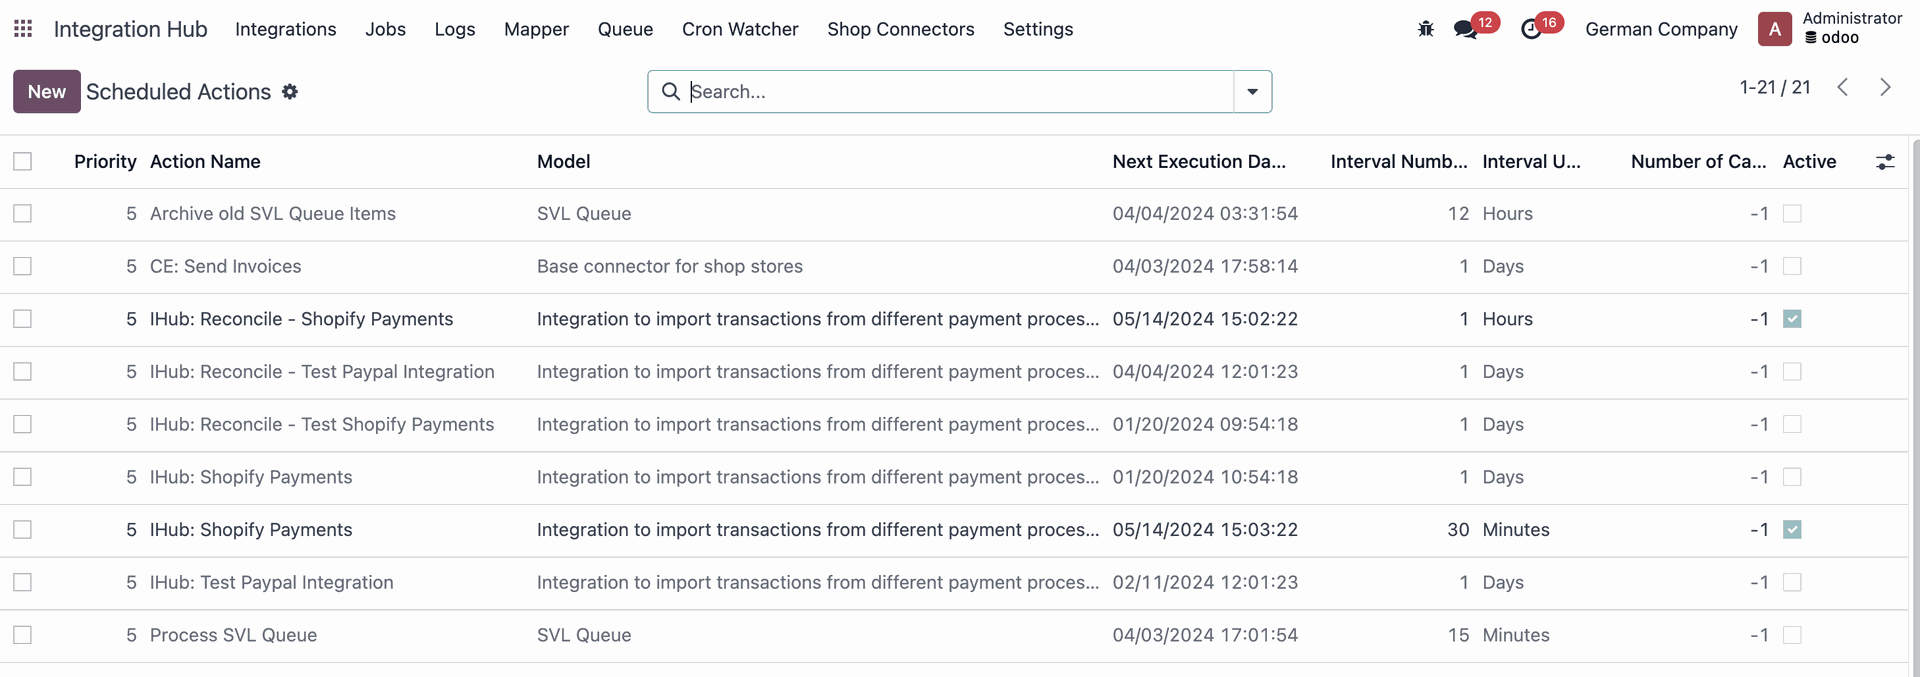
Activate and configure Scheduled Actions (Jobs)
After installing an integration in iHub, the related scheduled actions will be shown under the Jobs tab. You can access it by clicking on the Scheduled Actions smart button within an integration, or by clicking on Jobs > Cron Jobs in the top navigation bar.
Scheduled Actions Configuration
When opening an Action, you can configure the following settings :
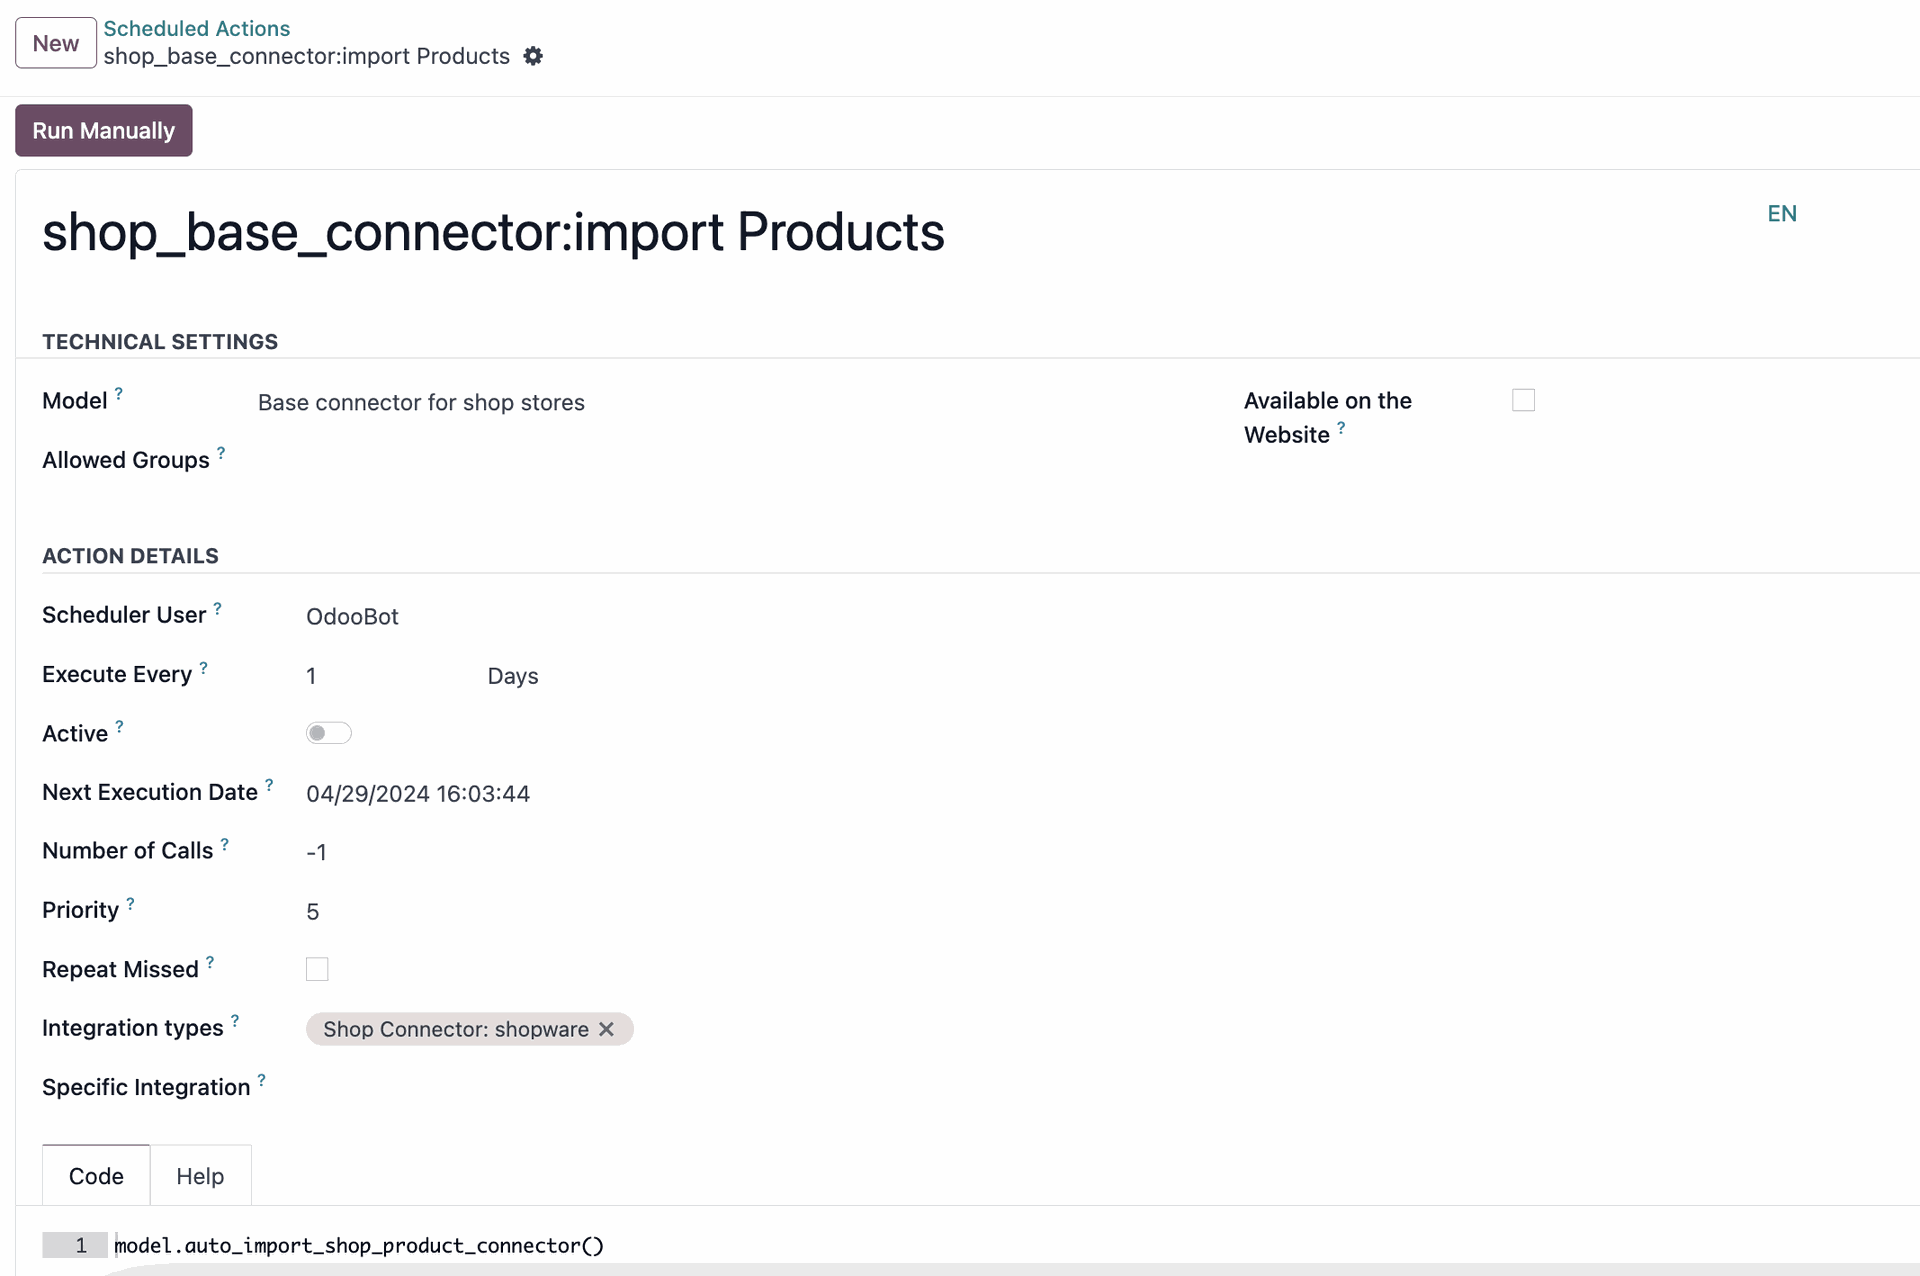
- Model: The Odoo model this action operates on.
- Allowed Groups: The user groups that are permitted to view and edit this scheduled action.
- Scheduler User: The Odoo user under whose account this action runs. This determines which records and rules apply during execution — it is not an access control setting.
- Execute Every: How often the action should repeat.
- Active: Toggle to activate or deactivate the action.
- Next Execution Date: The next time the action will be triggered, calculated as last execution date + execute every.
- Number of Calls: How many times the action method should be called per execution. -1 means unlimited.
- Priority: When multiple actions are scheduled at the same time, this determines the order of execution. 0 is highest priority, 10 is lowest.
- Repeat Missed: If an action was skipped due to server downtime, choose whether to run it when the server restarts.
- Integration Types: The integration types that will trigger this scheduled action.
- Specific Integration: Within an integration type, choose which specific integration instance will trigger this action.
Custom Cron Jobs Parameters
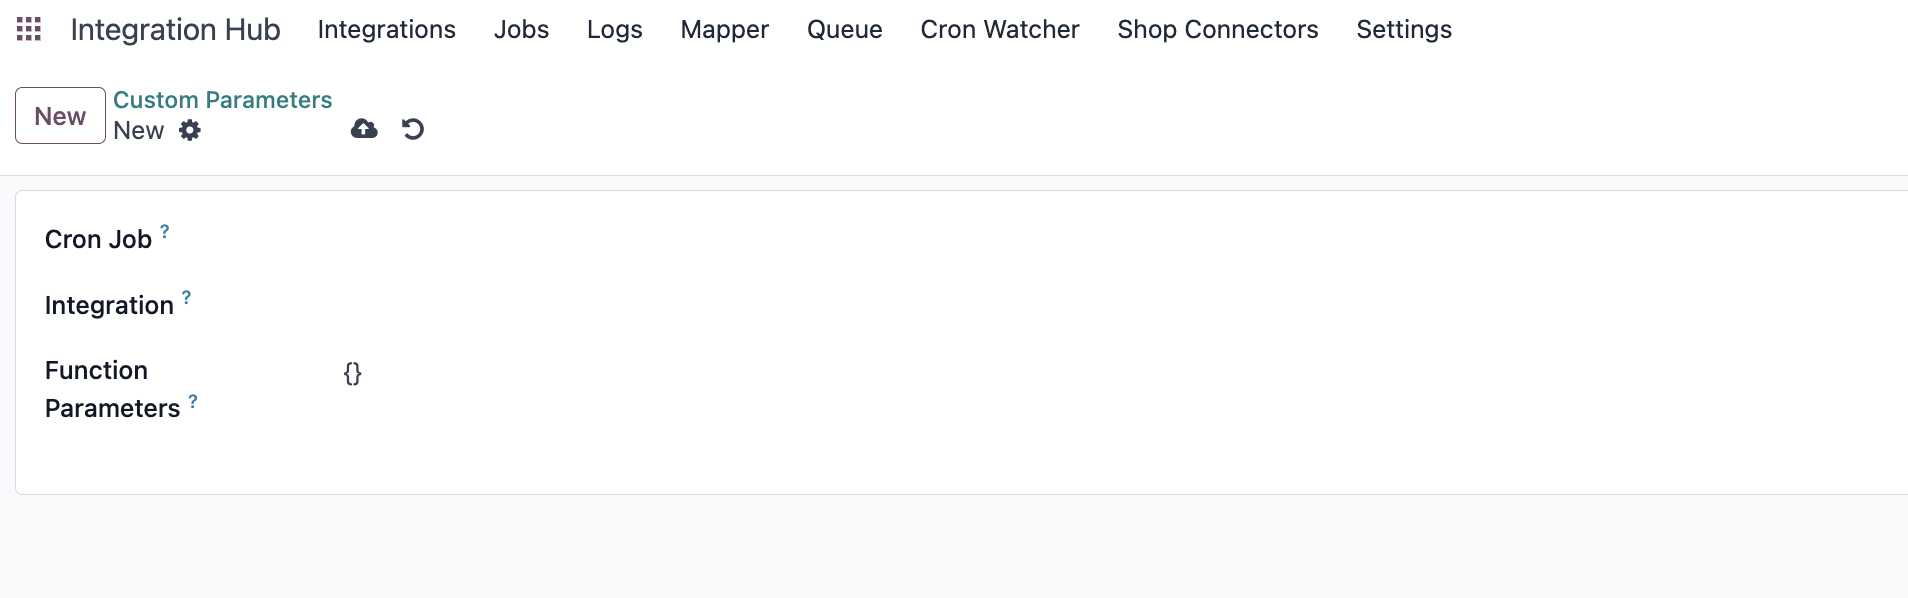
iHub allows you to further customise scheduled actions. You can define custom parameters that will appear in the action form and be passed to the action method at execution time.
To create a custom cron job parameter:
- Go to Jobs > Custom Cron Job Parameters and click New.
- Cron Job: Select the scheduled action this parameter applies to.
- Integration: Select the integration this parameter applies to.
- Function Parameters: Set the parameter dictionary (e.g. {"parameter_1": "hardcoded_value"}) to be passed to the cron method for the selected integration.
Background Jobs
While Scheduled Actions handle regular automated syncs, Background Jobs are used for longer-running operations that should not block the user interface — such as importing a large batch of products or processing a full order history. These jobs run asynchronously and track their own progress.
You can view all background jobs by going to Jobs > Background Jobs.
Job States
Each background job moves through the following states:
- In Progress: The job is currently running.
- Done: The job completed successfully.
- Partial: The job finished but logged one or more errors during execution. Review the related logs for details.
- Retry: The job is queued to be retried after a failure.
- Failed: The job has exceeded the maximum number of retries. Manual intervention is required.
- Cancelled: The job was manually cancelled before completing.
Stuck Jobs
If a job remains In Progress for an unusually long time, it may have stalled. iHub includes an automatic check that detects stuck jobs and can restart them. If you notice a job that appears to be frozen, you can also trigger the resume check manually from the Background Jobs list using Actions > Resume Stuck Jobs.
Activate and configure Logs
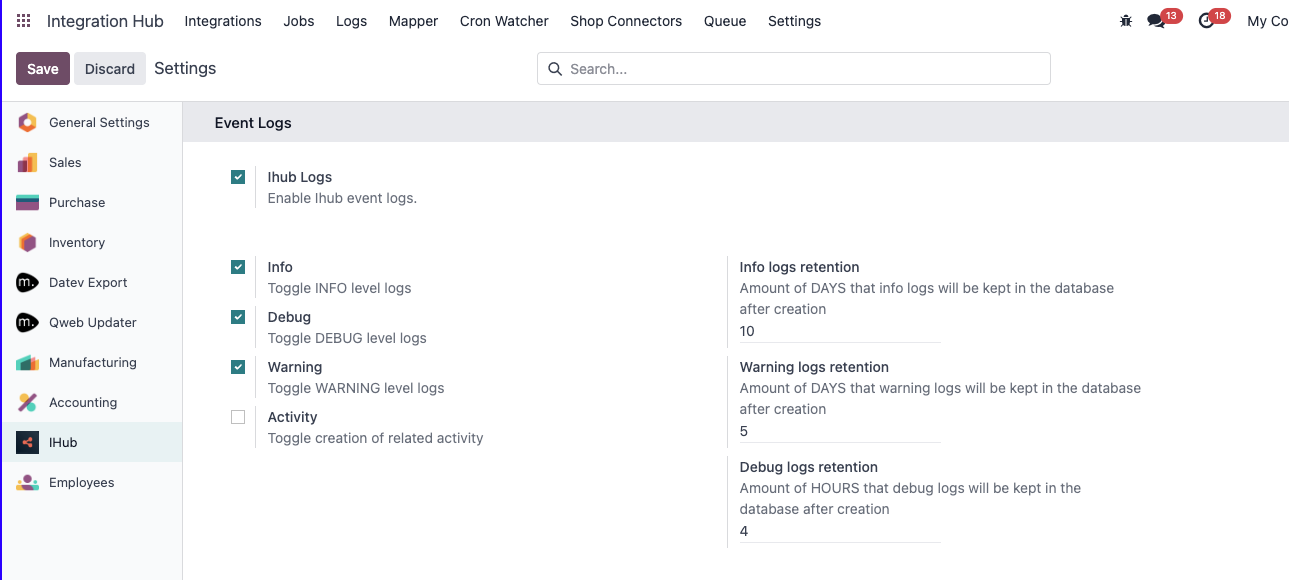
Logs track the status of all data exchanges happening between Odoo and integrated systems, giving you full visibility into what was imported, exported, or rejected — and why.
To activate Logs, go to Integration Hub > Settings > Event Logs and select the IHub Logs checkbox.
Log Levels
Once Logs are active, you can choose which types of events to record:
- Info: Confirms that a data exchange completed successfully. Use this to maintain a record of normal operations.
- Debug: Captures detailed technical information about each exchange step. Useful for diagnosing issues, but generates a high volume of entries. Recommended only during troubleshooting.
- Warning: Something unexpected happened but it was not critical — the operation may have continued with a fallback or partial result.
- Error: A data exchange failed. The record was not created or updated as expected. Action is recommended.
- Critical: A severe failure that requires immediate attention. If activity creation is enabled (see below), an Odoo activity is automatically assigned to a responsible user.
- Activity: When enabled, automatically creates an Odoo activity for the object that triggered a Critical error, assigning it to the configured user so it appears in their task list.
Log Retention
To prevent logs from accumulating indefinitely, iHub automatically purges old entries based on configurable retention periods. You can adjust these under Integration Hub > Settings > Event Logs:
- Info logs: Retained for 14 days by default.
- Warning logs: Retained for 14 days by default.
- Debug logs: Retained for 4 hours by default.
- Error and Critical logs: Never automatically deleted — these must be reviewed and cleared manually.
Log cleanup runs automatically every day. You can adjust retention durations at any time without affecting already-stored logs.
Automatic Activity Creation
iHub can automatically create an Odoo activity whenever a Critical error is logged, so that the issue appears directly in a user's task list without requiring manual log review.
To configure this, go to Integration Hub > Settings > Event Logs and enable Create Activity on Critical Error. You can then select:
- Primary Responsible User: The user who will receive the activity by default.
- Secondary Responsible User: A fallback user if the primary user is not available.
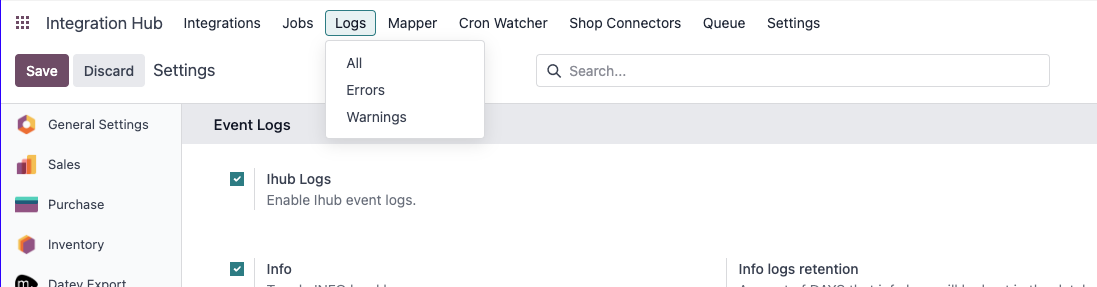
Reviewing Logs
Once logs are active and data starts flowing, you can access them under Logs in the Integration Hub navigation bar.
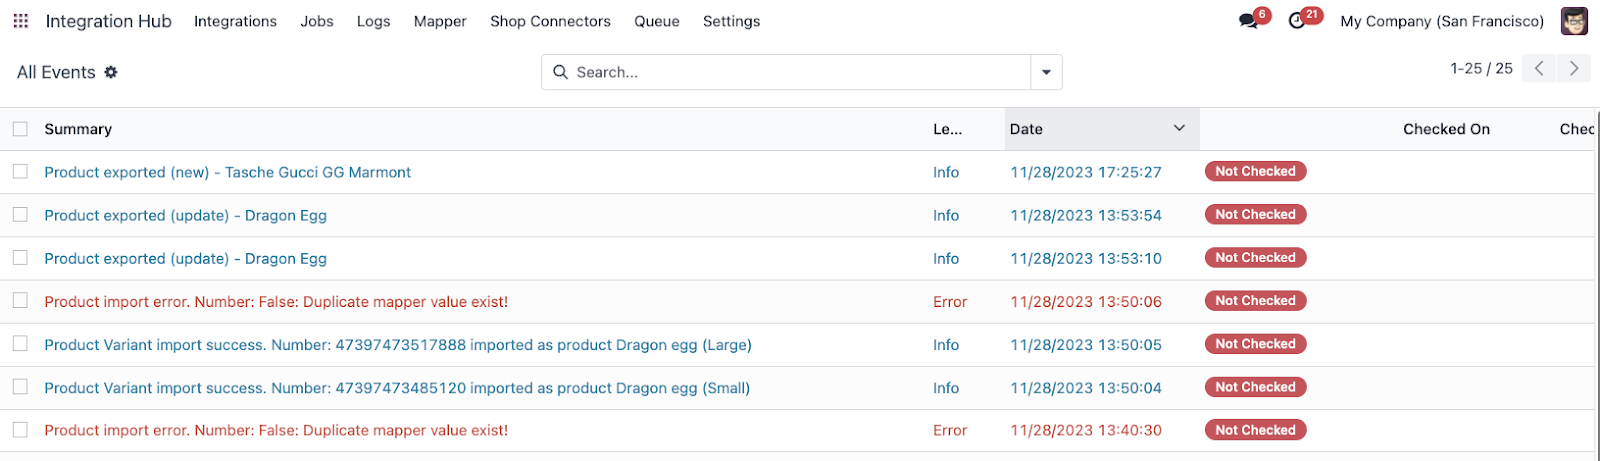
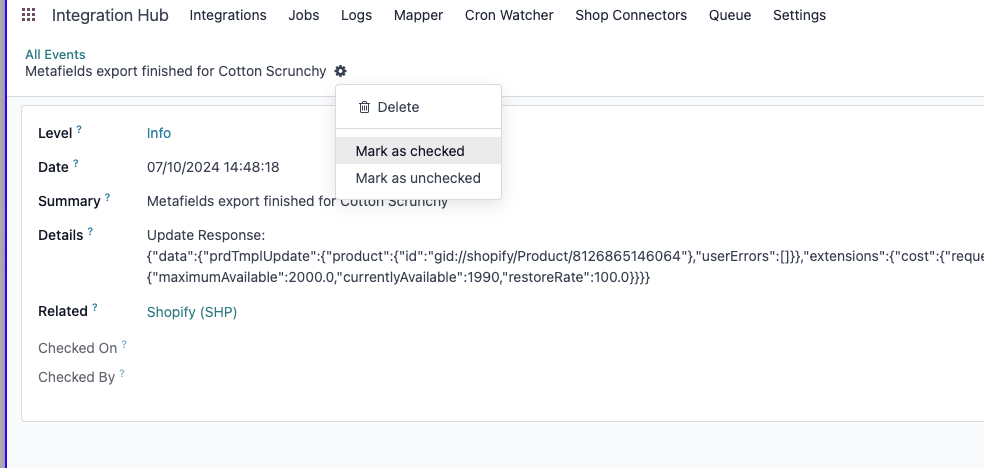
To ensure traceability, all logs are created with the status Not Checked. Once a log has been reviewed, mark it as checked:
- Open a log entry and go to Actions > Mark as Checked.
- The name of the reviewer and the date are recorded automatically.
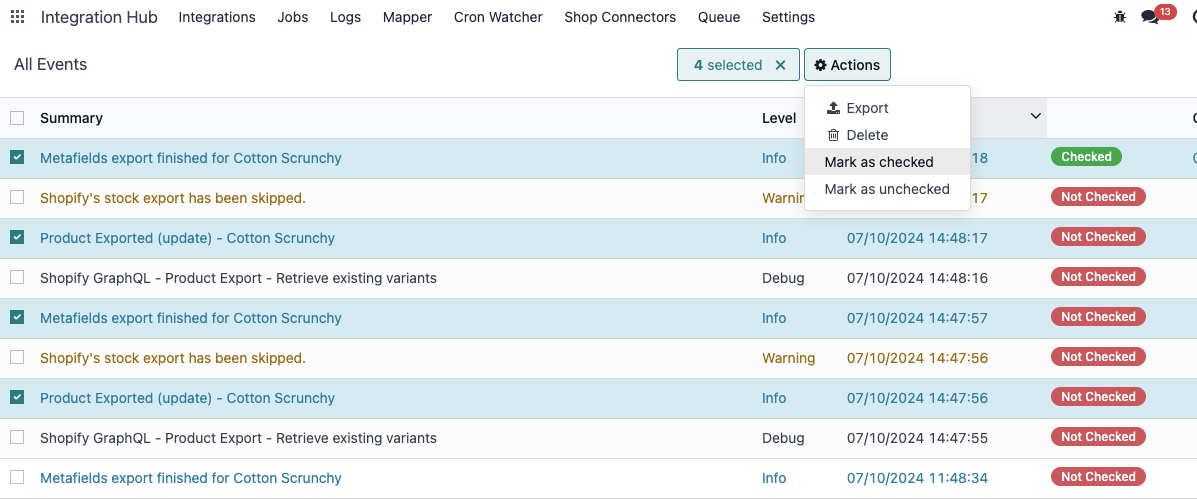
TIP 💡 - you can bulk check logs :
- Go to Logs > All
- Select the logs you want to Mark as Checked
- Click on Actions > Mark as Checked
Activate and configure Mappers
Mappers are used to associate an Odoo value with its equivalent value in the external system you are integrating with. This ensures that data imported into or exported from Odoo is always correctly interpreted on both sides.
To activate Mappers, go to Integration Hub > Settings > Mappers and select the IHub Mappers checkbox.
Mappers are organised in two levels: Mapper Types (defining the rule) and Mapper Items (the individual value pairs).
Mapper type
A Mapper Type defines which Odoo model and field the mapping applies to, and how iHub should behave when it encounters an unknown value.
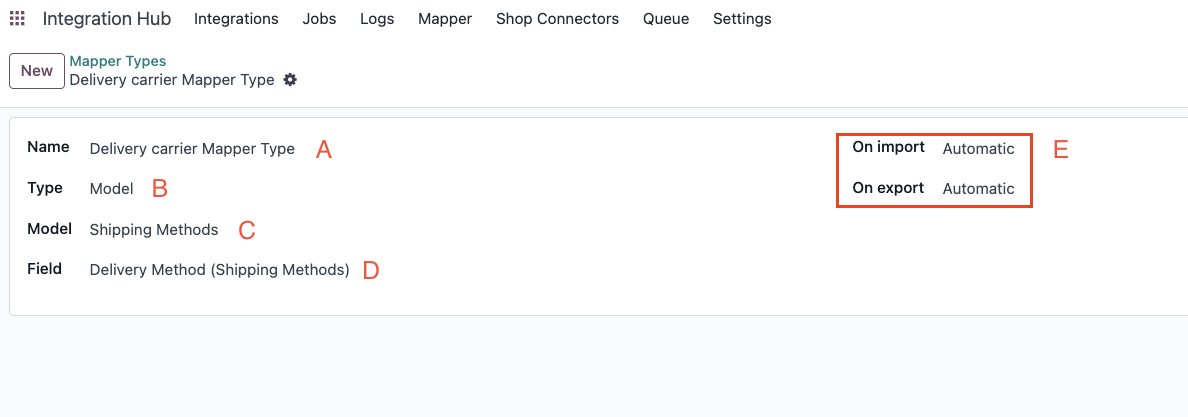
Mapper Types contain the following information:
- Name (A): A descriptive label for the mapper (e.g. "Tax Rate").
- Type (B): Model (maps to an Odoo record, such as a tax or a product) or Enum (maps to a fixed value such as a status code or a category name).
- Model (C): The Odoo model this mapper applies to.
- Field (D): The specific field on that model.
You can also define how iHub behaves when it encounters a value it has not seen before, separately for import and export (E):
- Automatic: A new Mapper Item is created automatically, and the missing Odoo value is filled in if possible.
- Manual: A new Mapper Item is created with the external value filled in, but the Odoo value is left blank for a user to complete.
- Fail: No Mapper Item is created and the import or export is rejected with an error.
The On Import and On Export behaviors are configured independently. For example, you might set Import to Manual (so unknown incoming values wait for a human decision) while Export is set to Automatic (so any known Odoo record is mapped and sent immediately).
Mapper items
A Mapper Item is one entry in the mapping table — it links a specific external value to a specific Odoo value. One Mapper Item is created per value that needs to be translated between the two systems.
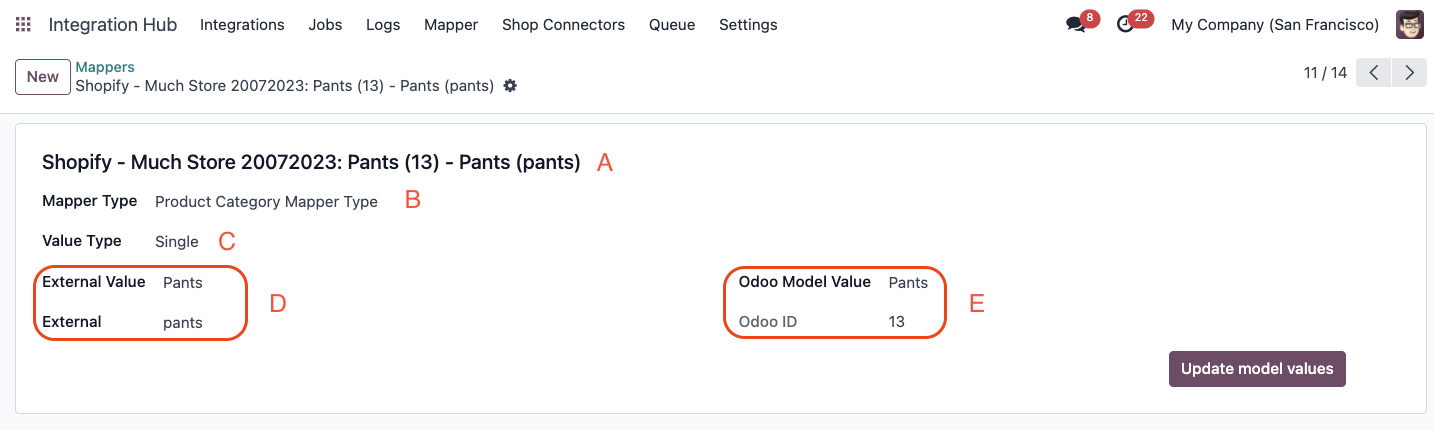
Mapper Items contain the following information:
- Name (A): A descriptive label for this mapping entry.
- Type (B): The Mapper Type this item belongs to.
- Value Type (C): Single (one external value) or Multiple (several external values that all map to the same Odoo value).
- External Value & External ID (D): The value or identifier as it appears in the external system.
- Odoo Value & ID (E): The corresponding Odoo record or value.
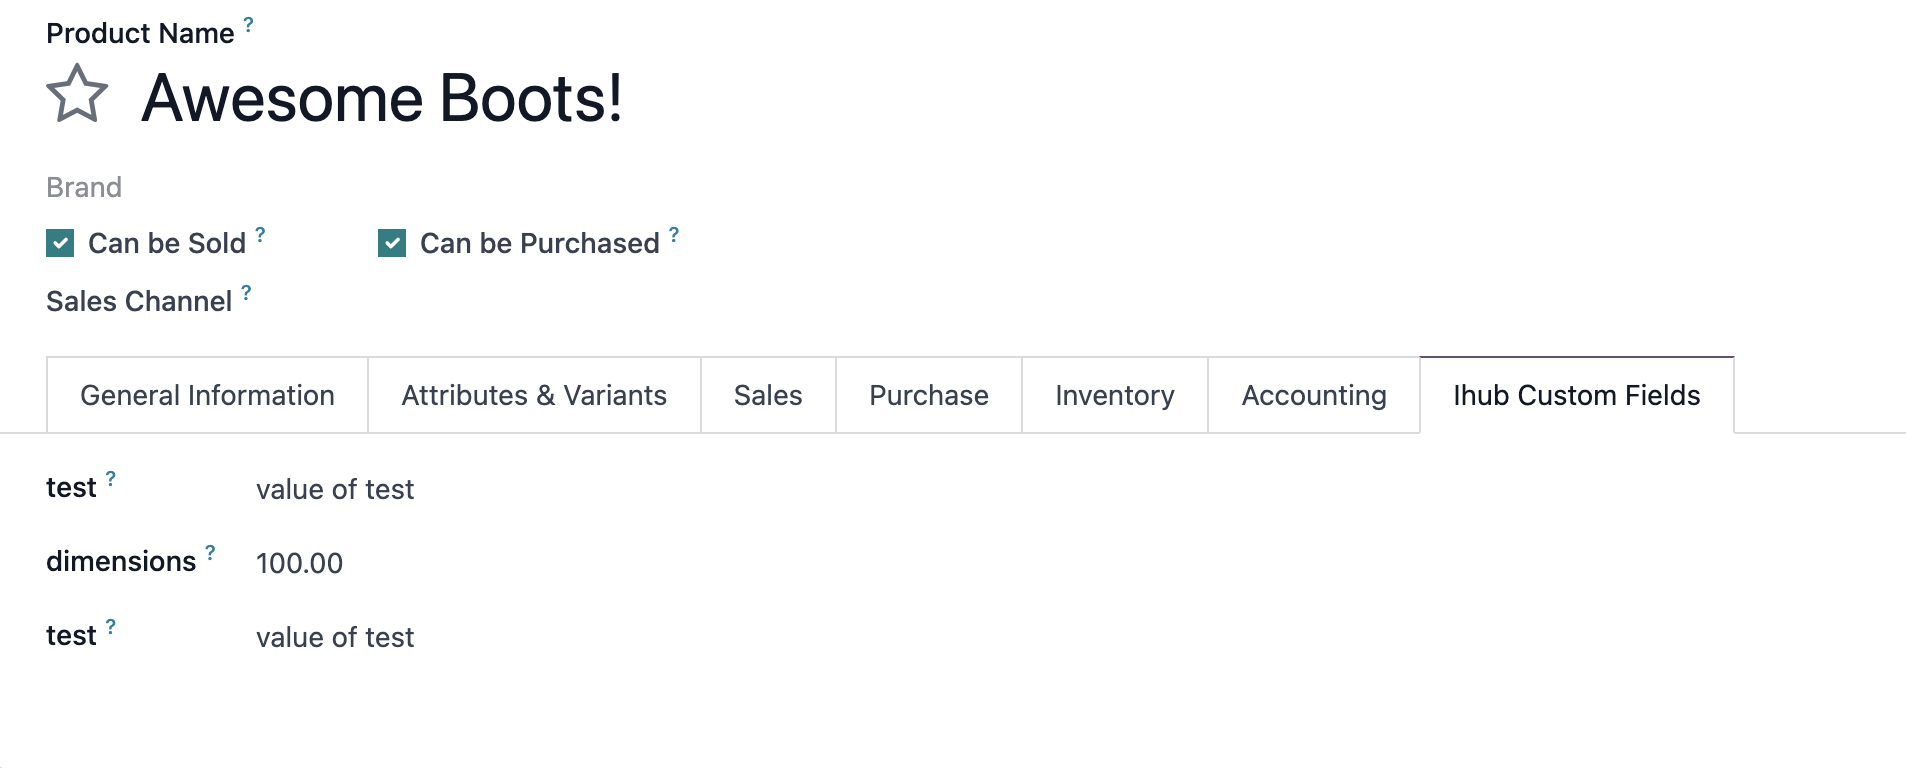
iHub Custom Fields
IHub allows you to create custom fields in any Odoo model to hold data that only exists in the external system.
Example: if your Shopify products have a custom property that does not exist in Odoo, iHub lets you create that field directly on the Odoo Product form so it can be synchronised.
In some integrations, custom fields are created automatically. To create one manually:
- Navigate to Integration Hub > Mappers > iHub Fields and click New.
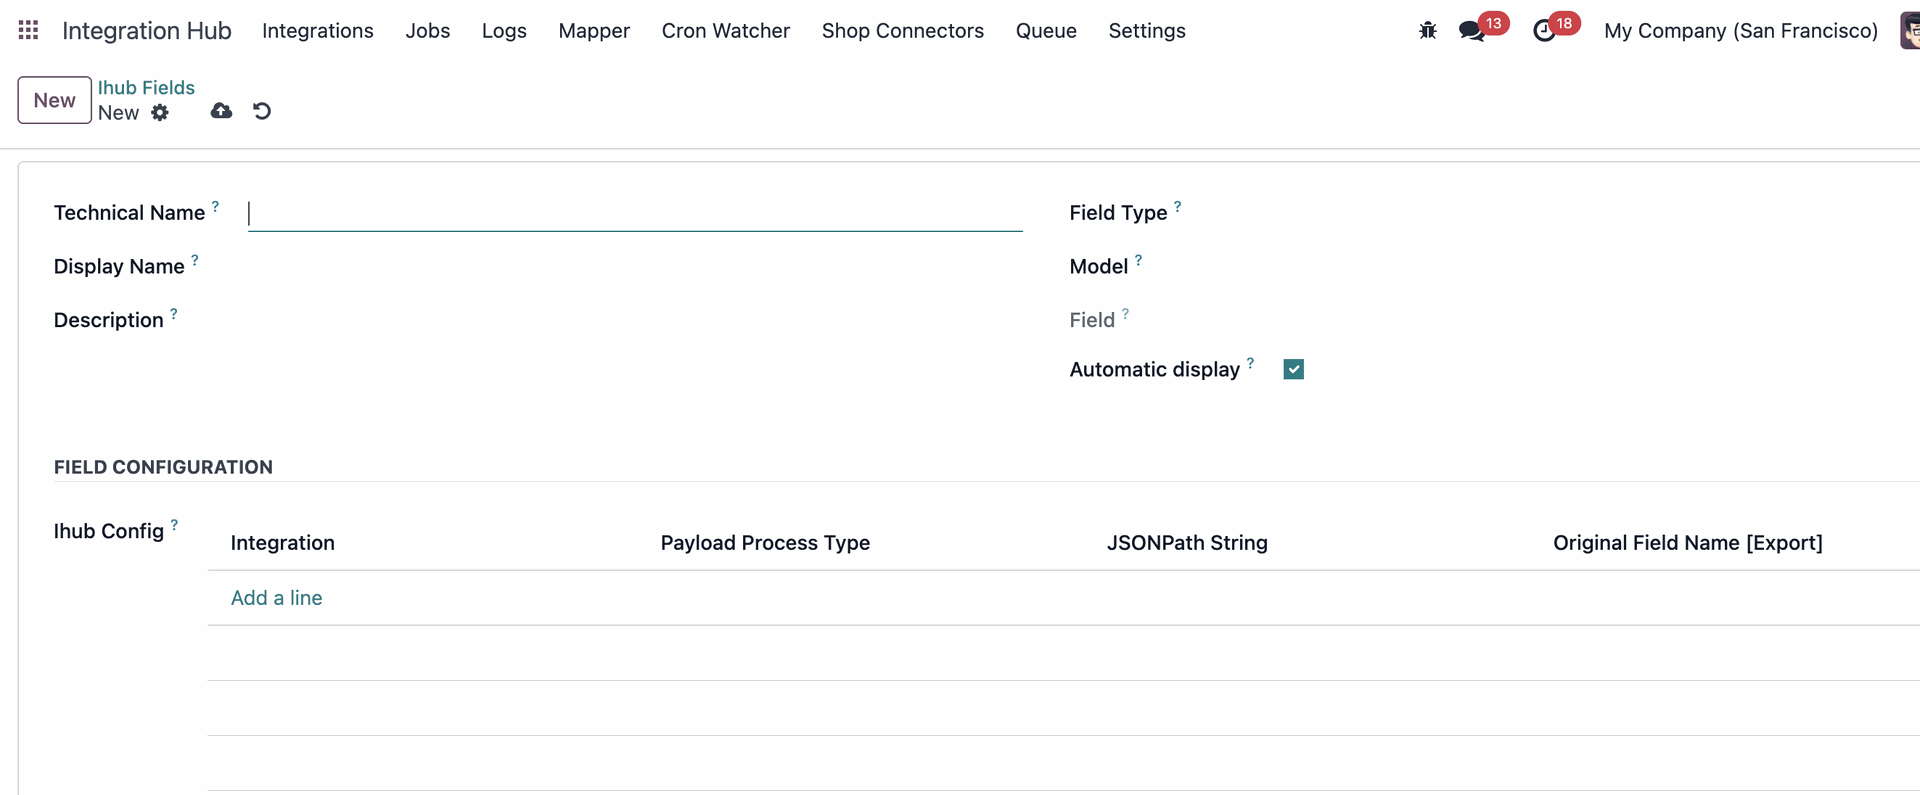
Fill in the following information:
- Technical Name: The field's internal name, used by the system. Only visible in debug mode.
- Display Name: The label the user sees in the Odoo interface.
- Description: A tooltip description shown when the user hovers over the field.
Field Type: The type of data this field holds:
- Boolean: True or false (checkbox).
- Char: Short text, such as a name or code.
- Float: A decimal number, such as a weight or price.
- Integer: A whole number, such as a quantity.
- Selection: A dropdown of pre-defined options.
- Date: A calendar date.
- Datetime: A precise date and time.
- Model: The Odoo model where this field should appear (e.g. Product).
- Automatic Display: Whether the field should appear automatically on the model's form view.
- iHub Config: The integration(s) that should export this field's value to the external system. This is typically completed by your integration engineer.
Once created, the custom field appears in the chosen model under the iHub Custom Fields tab.
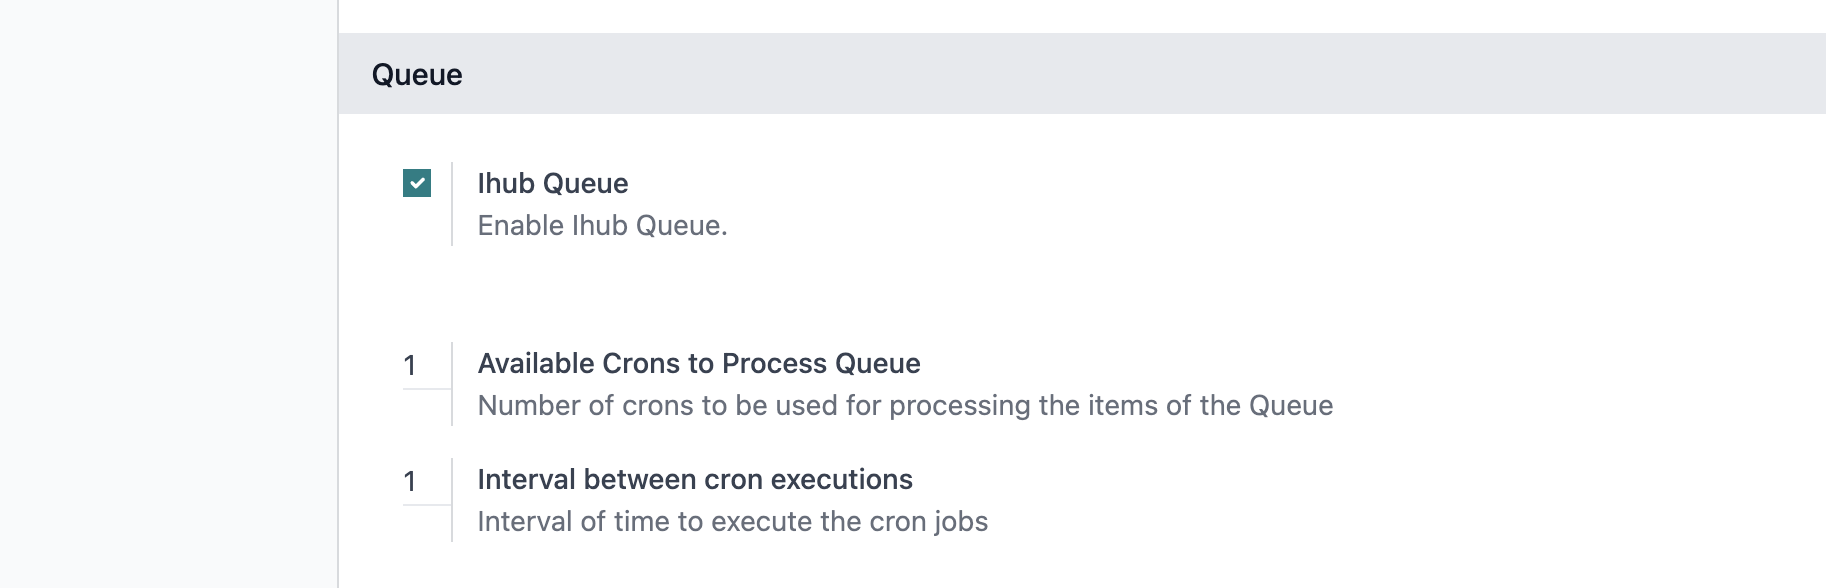
Activate and configure Queue
The Queue feature allows iHub to receive incoming data from an external system and process it in a controlled, ordered way. Instead of processing each incoming item immediately (which can cause conflicts during high-volume imports), items are stored in a queue and processed one at a time — either automatically on a schedule or manually.
To activate the Queue, go to Integration Hub > Settings > Queue and select the IHub Queue checkbox.
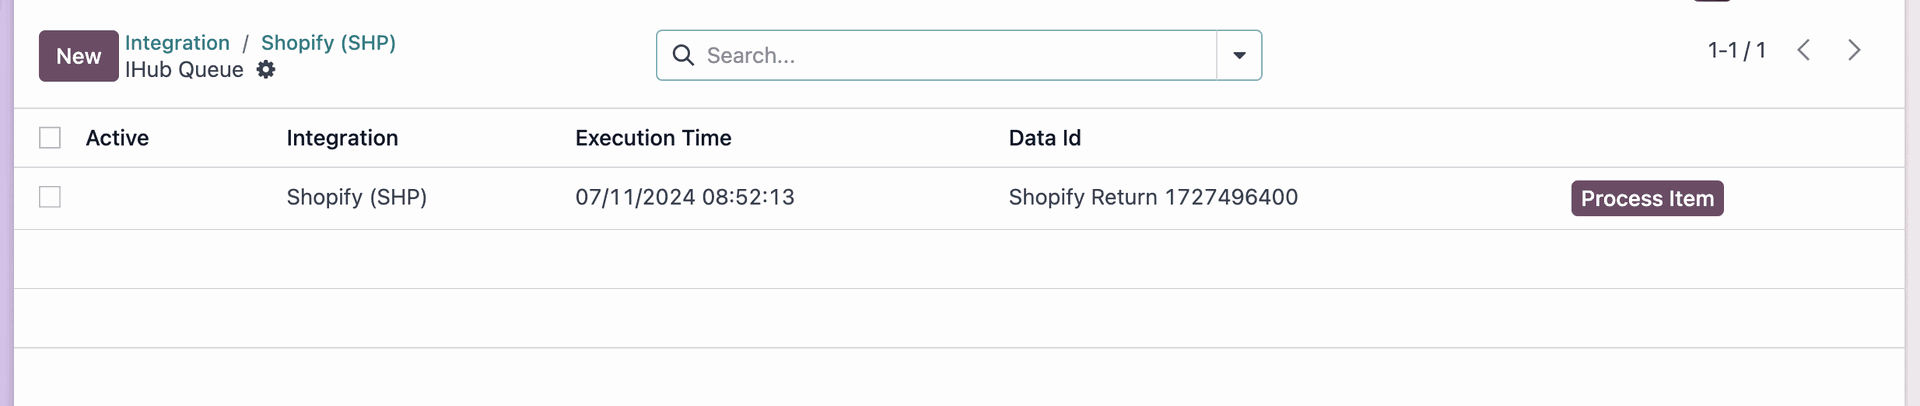
Processing Queue Items
Once items are in the queue, you can process them in two ways:
- Automatic processing: A scheduled action checks the queue at regular intervals and processes items in order of their Execution Time — the earliest scheduled items are processed first.
- Manual processing: Open a queue item and click Process to process it immediately.
You can view the queue for a specific integration by clicking the Queue smart button on the integration form, or by navigating to Logs > Queue.
Queue Configuration
You can configure how the queue processes items under Integration Hub > Settings > Queue:
- Number of Processing Jobs: How many parallel cron jobs process the queue simultaneously. Increase this if you need higher throughput.
- Execution Interval: How frequently (in seconds) the queue processor checks for new items to process.
Each queue processor handles items one at a time and processes a maximum of 100 items per run. For very high volumes, increase the number of parallel processing jobs.
Failed Queue Items
If a queue item fails to process, it is archived rather than deleted, and the reason for the failure is saved. This ensures no incoming data is silently lost.
To review failed items, go to the queue list and switch to the Failed filter. You can inspect the failure reason on each item and, once the underlying issue has been fixed, re-activate the item to queue it for reprocessing.
Cronwatch
Cronwatch is a monitoring feature that alerts you when a critical Scheduled Action stops running. If a watched cron job becomes inactive — whether intentionally or due to an error — subscribed users receive an automatic email notification so the issue can be addressed before it creates data gaps.
Setting up a Watcher
- Navigate to Jobs > Cronwatch and click New.
- In the Cron Job field, select the Scheduled Action you want to monitor.
- Add yourself or your team as Followers using the chatter at the bottom of the form — these are the users who will receive notifications.
- Click Save.
Notifications
Once a watcher is set up, iHub periodically checks the status of the linked cron job. The following events trigger a notification to all followers:
- The cron job is deactivated (Active is set to false).
- The cron job is deleted.
If the cron job is subsequently reactivated, the watcher resets and will notify again if the job stops in the future.
Cronwatch is especially useful for business-critical syncs — for example, an order import job that must run hourly. A missed execution could mean orders are not created in Odoo, and Cronwatch ensures you are notified the moment something stops.
Integration Dates
Integration Dates are reference timestamps that an integration uses internally to track the progress of syncs — for example, "last successful import at 14:30 on 24 May". They are typically set automatically by the integration as it runs, and allow each subsequent sync to pick up only what has changed since the last run.
You can view and manually adjust Integration Dates by clicking the Dates smart button on an integration form, or by going to Integration Hub > Integrations and opening the relevant record.
⚠️ Manually editing an Integration Date can cause data to be re-imported or skipped on the next sync. Only adjust these values if you know what range you want to re-process, or if instructed to do so by your integration engineer.