Procuros <> Odoo integration : User documentation
The following documentation will provide you with the information you need to use the much. Procuros - Odoo integration. The objective is to get you familiarised with the integration by providing relevant information as to the main business processes it covers, and how you can configure it to best suits your needs.
Configuration
Installation pre-requisites
For the Procuros <> Odoo integration to function, please make sure that you have the following Odoo standard modules installed :
- Sales
- Invoicing
- Accounting
- Inventory
Install the Procuros Connector
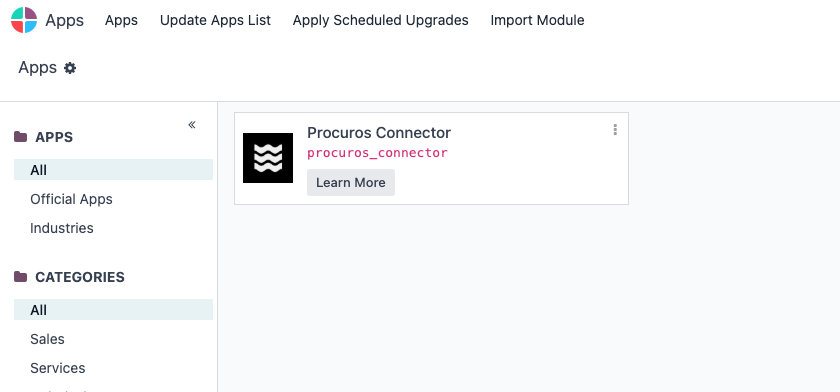
- Go to Odoo > Apps and search for Procuros.
- Click Activate.
Create and Configure the Connector
First, you need to establish the main connection to your Procuros account.
Navigate to Procuros Connector in the main Odoo menu and select Connectors.
Click Create to set up a new connector.
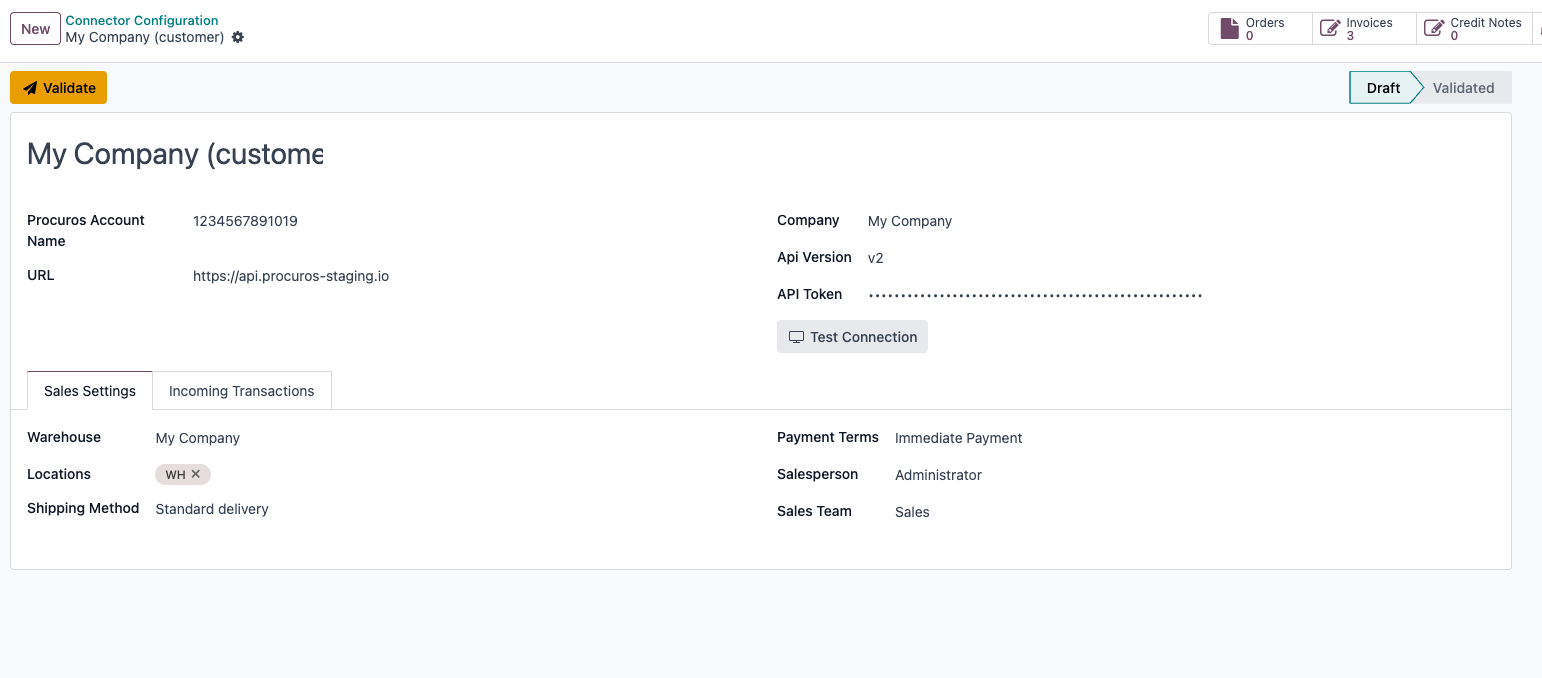
Fill in the following fields on the form:
Name: A descriptive name for the connection (e.g., "Procuros Live Connection").
Procuros Account Name (External Identifier): Your company's unique GS1 identifier provided by Procuros.
URL: The API URL for your Procuros environment (e.g., https://api.procuros.io).
API Token: The secure API token from your Procuros account. This is a password field.
API Version: Defaults to v2.
Company: The Odoo company this connector is for. You can only have one validated connector per company.
Navigate to the Sales Settings tab to define default records for incoming sales orders:
Warehouse: The default warehouse for new sales orders.
Locations: Default stock location(s).
Shipping Method: The default carrier for deliveries.
Payment Terms: The default payment terms. This is a required field.
Salesperson: The default user responsible for new sales orders.
Sales Team: The default sales team.
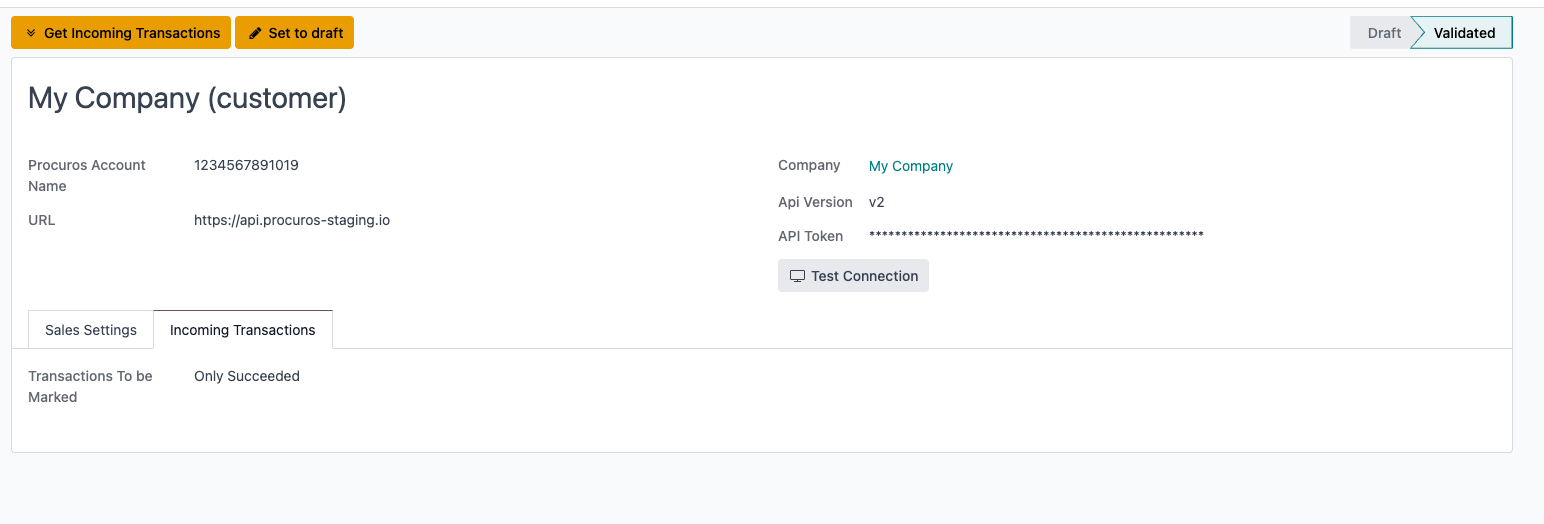
Navigate to the Incoming Transactions tab:
Transactions To be Marked: Decide what transactions should be marked as "processed" in the Procuros portal.
Only Succeeded: Marks only transactions that were successfully created in Odoo.
All Transactions: Marks all transactions, including those that resulted in a data issue.

Test and Validate the Connector
- Once you have filled in the API details, click the Test Connection button (with the television icon). If successful, you will see a notification confirming the connection.
If the test is successful, click the Validate button at the top of the screen. The connector's status will change from 'Draft' to 'Validated'. The connector is now live and ready to process documents.
Setup your Procuros Suppliers
If you are using Procuros as a customer to communicate with your suppliers (purchase-to-pay), you need to setup your suppliers contacts in Procuros and Odoo.
Setup in Procuros
To enable the correct transactions to flow between Odoo and Procuros :
- Login to your Procuros interface.
- Navigate to My Connections
- For each of your trade partner, make sure the following document types are enabled:
- Orders (Direction : You send)
- Shipping notices (Direction : You receive)
- Invoices (Direction : You receive)
- Credit notes (Direction : You receive)
Setup in Odoo
To setup your supplier contacts in Odoo :
- In the Odoo Contact app, open your supplier contact form.
- Under the Sales&Purchase tab, fill out the following information (* are mandatory fields)
- Procuros Connector* : Procuros integration name
- Require Order Response : if checked, will automatically confirm sent purchase orders.
- Reference* : enter your supplier GLN.
Setup your Procuros Customers
If you are using Procuros as a supplier to communicate with your customers (order-to-cash), you need to setup your customers in Procuros and Odoo.
Setup in Procuros
To enable the correct transactions to flow between Odoo and Procuros :
- Login to your Procuros interface.
- Navigate to My Connections
- For each of your trade partner, make sure the following document types are enabled:
- Orders (Direction : Receive)
- Shipping notices (Direction : Send)
- Invoices (Direction : Send)
- Credit notes (Direction : Send)
Setup in Odoo
To setup your customers contacts in Odoo :
- In the Odoo Contact app, open your customer contact form.
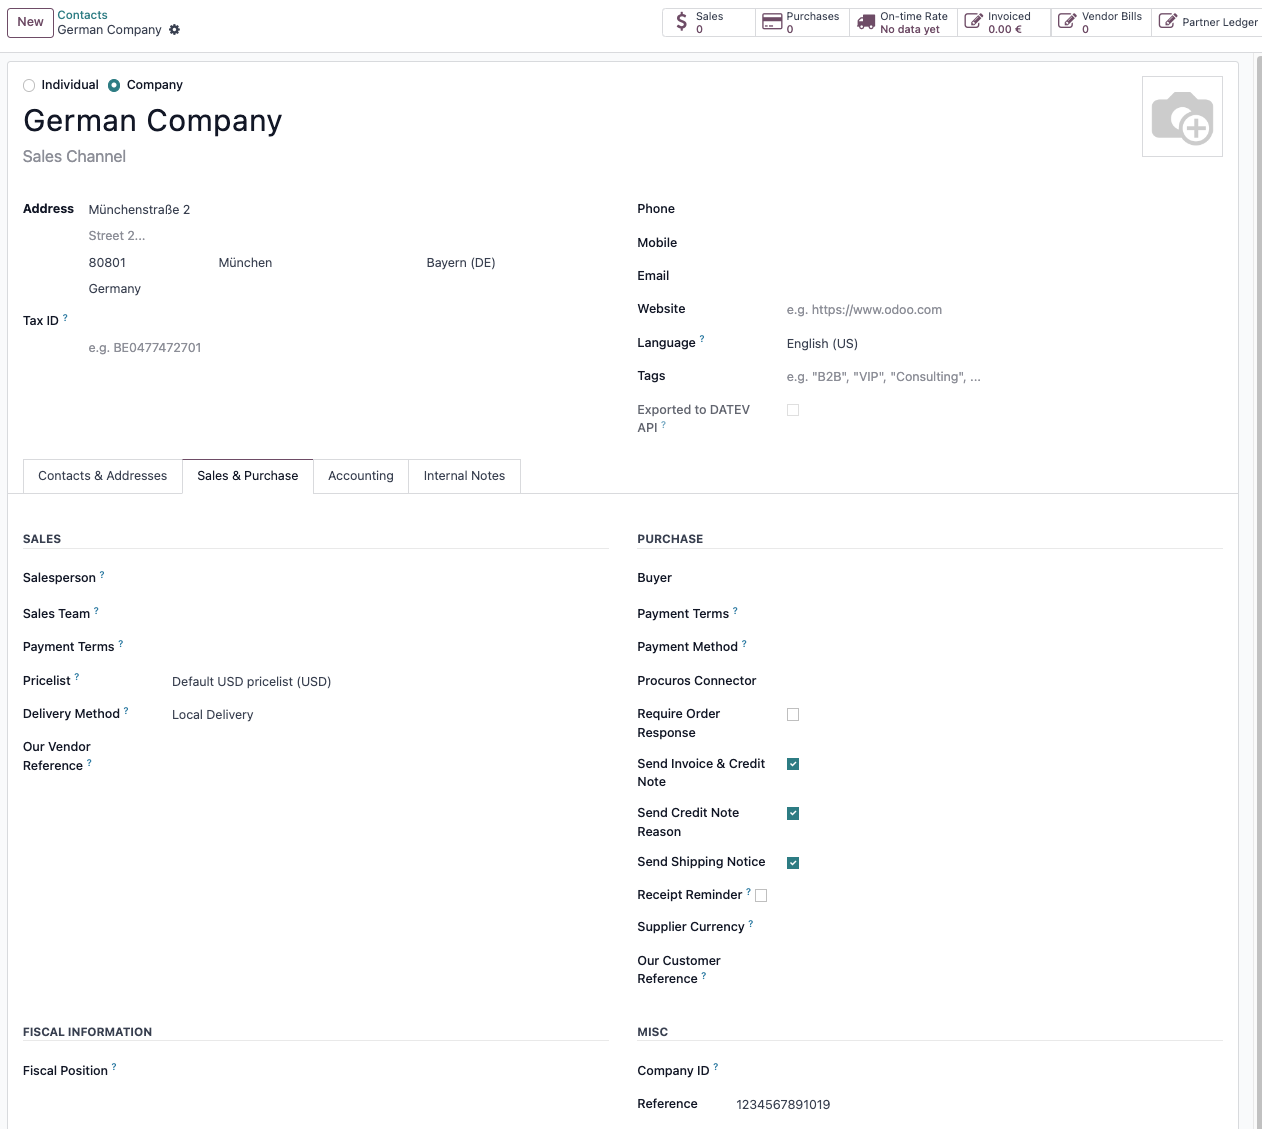
- Under the Sales&Purchase tab, configure the following (* are mandatory fields)
- Send Invoice & Credit Notes : automatically sends invoices and credit notes to your customers
- Send Credit Note Reason : display credit note reason on credit note import
- Send Shipping Notice : automatically sends shipping notice to your customers
- Reference* : enter your customer's GLN.
Setup your Procuros Products
For product to be matched when receiving transaction through Procuros, the products you are buying or selling must have :
- the same barcode in Odoo as your trade partner.
- the product Unit of Measure must be matched to the one used by your trade partner.
Product Barcode
To setup your product barcode :
- Go to Inventory > Product and open the product you are purchasing or selling.
- In the barcode field, enter the barcode shared with your trade partner :
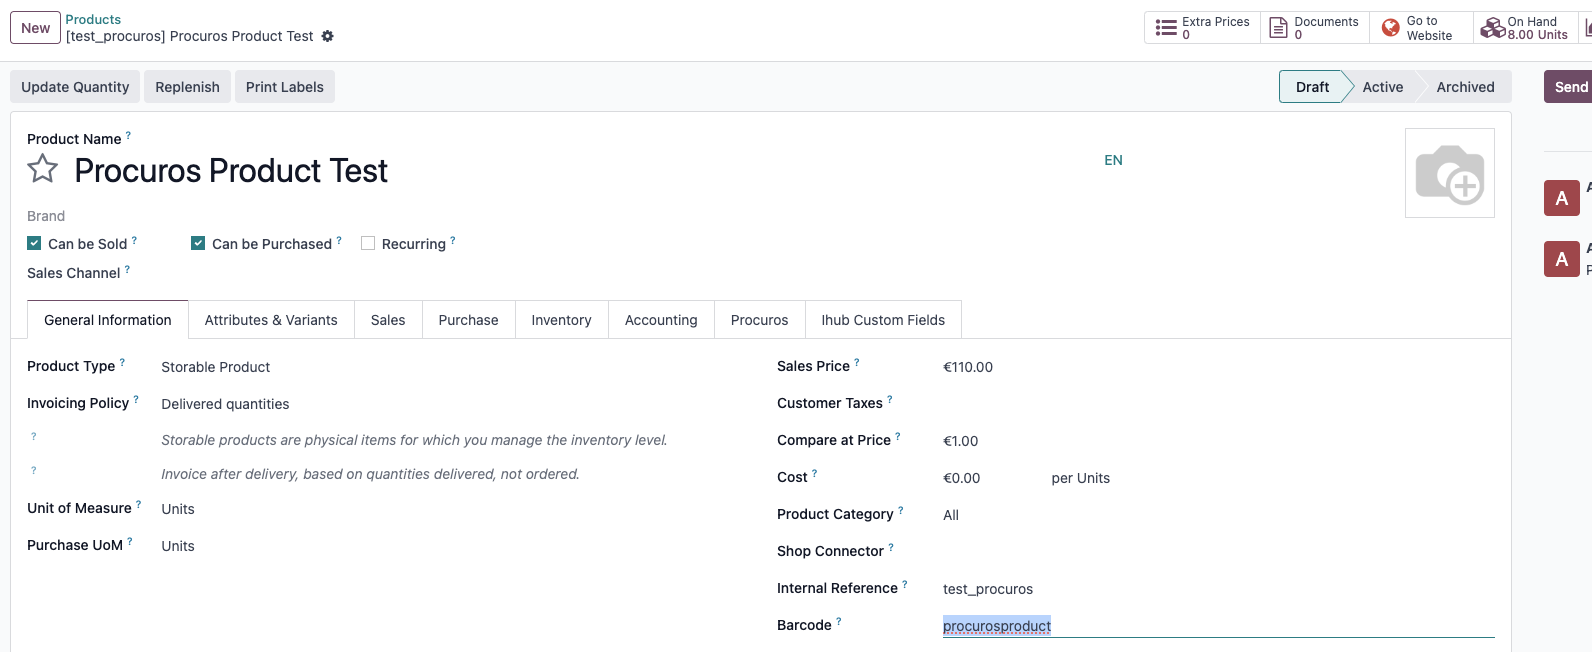
In Odoo
In Procuros
Product Units of Measure
To setup your product UoM :
- In Odoo, go to Sales > Configuration > Units of Measure
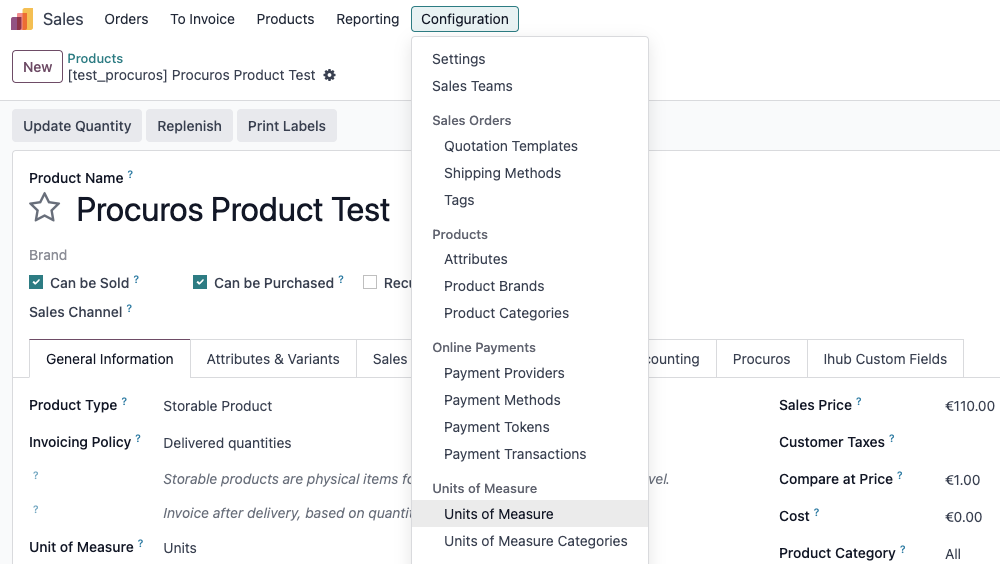
- Open your product UoM example : the product UoM I am configuring is Units

- In the Procuros Unit Type field, enter the UoM used by your trade partner. example : my trade partner is using EA as a UoM
- Click Save.
Activate the Scheduled Actions
To fully automate the process, you need to activate the cron jobs that handle the background processing.
Go back to your validated connector form (Procuros Connector > Connectors).
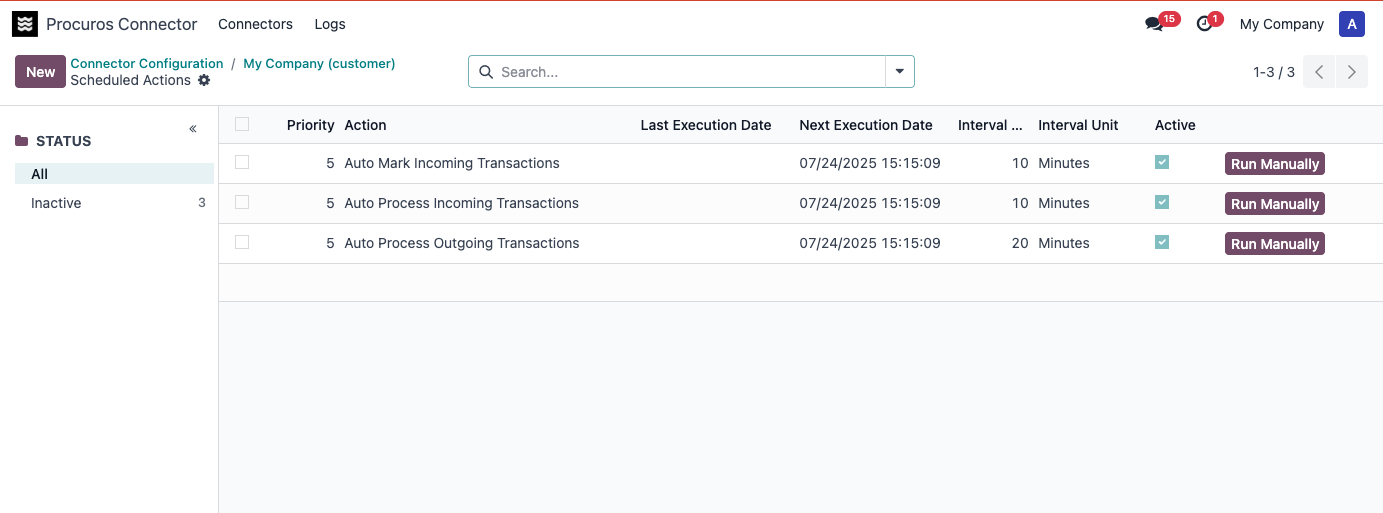
Click on the Scheduled Actions smart button.
For each of the following jobs, open the form, and ensure it is active:
Auto Process Incoming Transactions: Fetches new documents from Procuros.
Auto Mark Incoming Transactions: Marks documents as processed in the Procuros portal.
Auto Process Outgoing Transactions: Sends documents from Odoo that are ready to be transmitted.
Usage
In this section, you will learn how to use the integration in your daily workflows.
Interact with Suppliers : Purchase-to-Pay
The Purchase-To-Pay process refers to the cycle where a Business procures its supplies by :
- Sending RFQs or Purchase Orders to Suppliers
- Receives Shipping Notice from Suppliers for the related Purchase Order
- Receives Invoices from Suppliers to pay as Vendor Bills
- Receives Credit Notes to be reimbursed as Vendor credit notes.
The Procuros <> Odoo integration covers all these processes, which will be described in the following sub-sections.
Sending Purchase Orders to Procuros
As a first step to the Purchase-to-Pay process, a customer creates a Request for Quotation for a supplier including one or multiple products he wants to purchase.
To send a Request for Quotation to Procuros :
- Go to the Purchase App and click New.
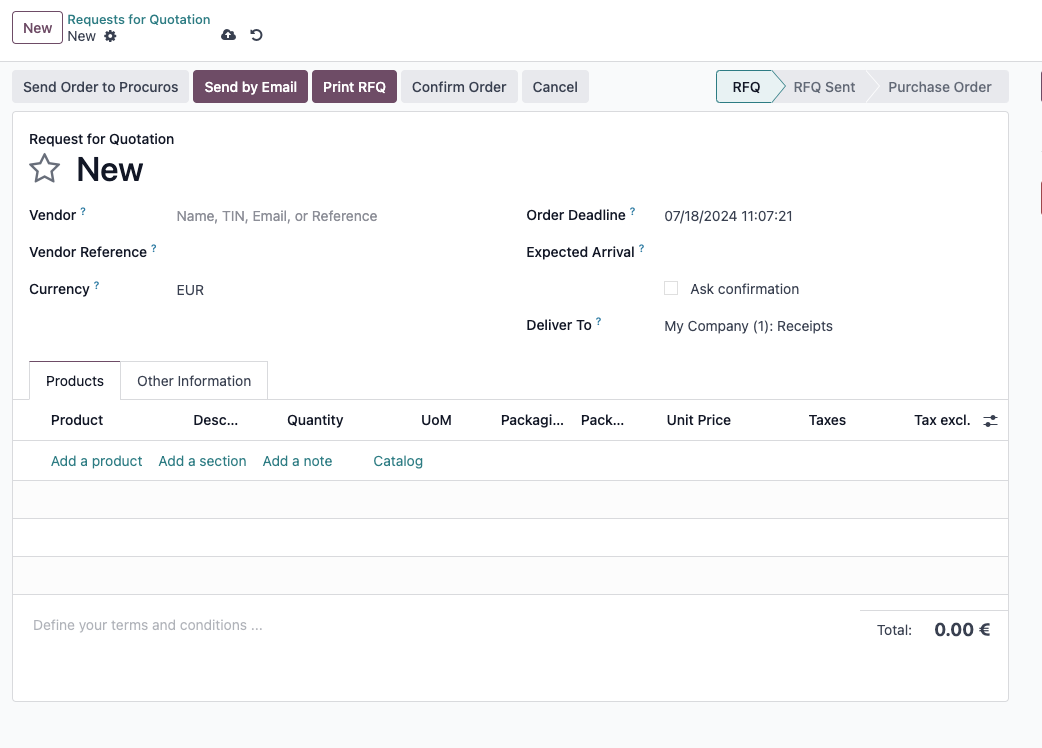
- In the Vendor field, enter your Procuros supplier.
- In the order lines, enter the product you want to order from your Procuros supplier.
- Click Send Order to Procuros.
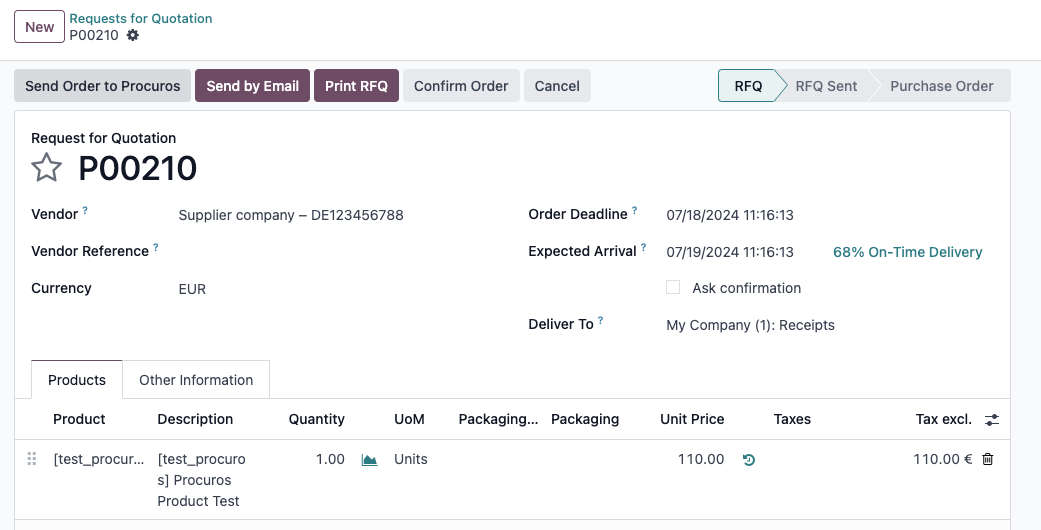
You can find a log of the successful export of the transaction in Procuros > Logs.

Receiving Shipping Notice from Procuros
Once your supplier ships your order, the Shipping Notice will be imported from Procuros.
The integration will automatically import Shipping notice from Procuros on a scheduled basis.
To modify this scheduled action, you can go to Procuros Connector and click the Scheduled Actions smart button at the top of the page.
Receiving Vendor Bills from Procuros
Once your supplier sends the invoice related to your Purchase Order, it will be imported from Procuros as a Vendor Bill.
The integration will automatically import Vendor Bills from Procuros on a daily basis.
To modify this scheduled action, you can go to the Procuros Connector and click the Scheduled Actions smart button at the top of the page.
Receiving Vendor Credit Notes from Procuros
If you decide to return an order to your supplier, he needs to send you the related Credit Note after reception of the return. Once sent to Procuros, it will be imported in Odoo as a Vendor Credit Note.
The integration will automatically import Vendor Credit Notes from Procuros on a daily basis.
To modify this scheduled action, you can go to the Procuros Connector and click the Scheduled Actions smart button at the top of the page.
Interact with Customers : Order-to-cash
The Order-to-cash process refers to the cycle where you sell to customers by :
- Receiving Sales Orders from customers
- Sending Shipping Notice to customers for the related Sales Order
- Sending Invoices to customers.
- Sending Credit Notes in case your customer returns an order.
The Procuros <> Odoo integration covers all these processes, which will be described in the following sub-sections.
Receiving Sales Orders from Procuros
Once your customer places an order and sends it to Procuros, it will be imported in Odoo as a Quotation.
The integration will automatically import orders from Procuros on a daily basis.
To modify this scheduled action, you can go to the Procuros Connector and click the Scheduled Actions smart button at the top of the page.

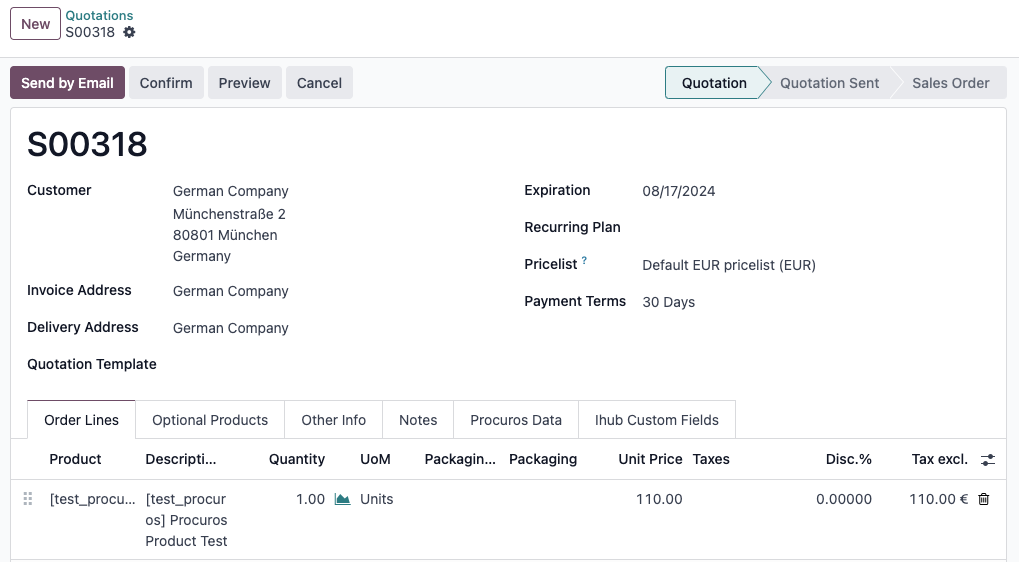
After import, you can Confirm the quotation, turning it into a Sales order.
Sending Order Responses to Procuros
You can send an Order Response back to your customer:
Trigger: On a Sales Order, once you confirm or cancel it, a button Send Order Response to Procuros appears.
Wizard & Comments: If "Order Response Comment" is enabled for the partner, Odoo will prompt you with a wizard to enter a reason for any changes or cancellations. This comment is included in the electronic payload sent to the customer.
Determining Type: Odoo automatically detects if the response should be marked as "ACCEPT" (no changes), "REJECT" (cancelled), or "CHANGE" (modified quantities/dates).
Sending Shipping Notices to Procuros
Delivery orders are automatically created on Sales order confirmation. Once your warehouse ships the order, the shipping notice need to be sent to Procuros.
To export order shipment :
- From the Sales order, click on the Delivery order smart button.
- Once your warehouse validates the shipment, click on Validate.
- Once Validated, click on Send Picking to Procuros to export the shipping notice.
NOTE : The integration will automatically export shipment to Procuros on a scheduled basis, without you having to manually click the Send Order to Procuros button.
To modify this scheduled action, you can go to the Procuros Connector and click the Scheduled Actions smart button at the top of the page.
Sending Invoices to Procuros
Having received the Sales Order and having sent the Order shipment to Procuros, now the process concludes by sending the associated Invoice.
To export the order invoice :
- From the Sales Order, click on Create Invoice.
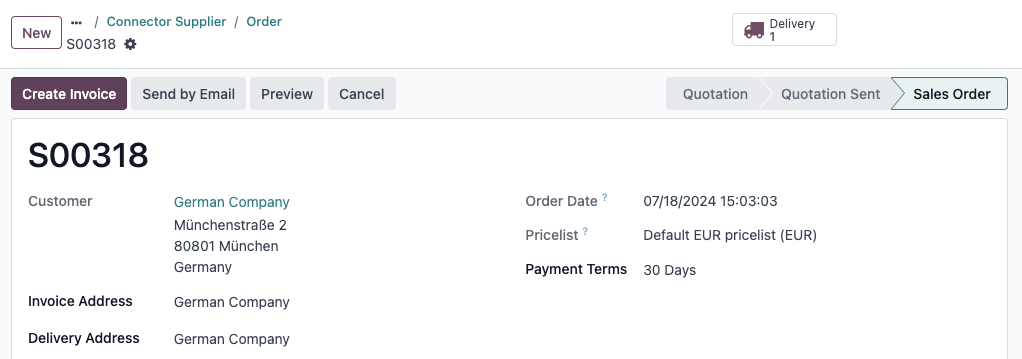
- Click on Confirm
- Click on Send Invoice to Procuros.

A log for the successful export is created in Procuros > Logs.

NOTE : The integration will automatically export invoices to Procuros on a scheduled basis, without you having to manually click the Send Invoice to Procuros button.
To modify this scheduled action, you can go to Procuros and click the Scheduled Actions smart button at the top of the page.
Sending Credit Notes to Procuros
If a customer returns an order, or the price of an invoice needs to be adjusted, you might need to send credit notes to your customer through Procuros.
To export a Credit Note to Procuros:
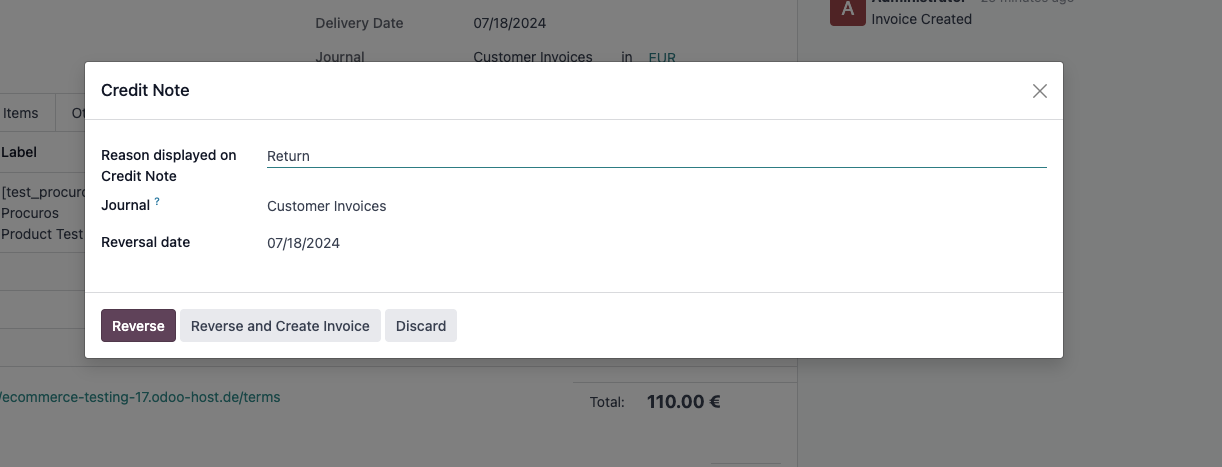
- Go to the invoice that need to be reverted and click Credit Note.
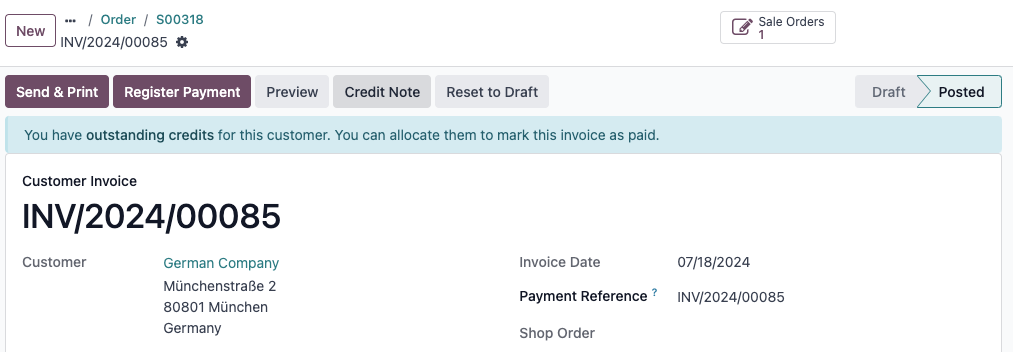
- Select a Credit Note reason, journal and click Reverse.
- Confirm the Credit Note and click Send Credit Note to Procuros.
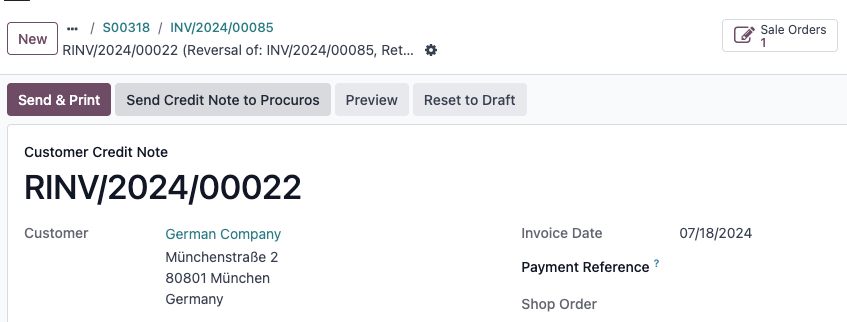
A log for the successful export is created in Procuros > Logs.

Monitoring and Logs
The connector provides comprehensive logging to monitor all activity and troubleshoot issues.
Navigate to Procuros Connector > Logs.
The logs are categorised for easy access:
All Logs: A complete history of all transactions.
Info Logs: Successful operations.
Data Issues Logs: Errors caused by missing or mismatched data (e.g., an unrecognised product barcode). These are the most common issues to check.
Response Error Logs: Errors returned by the Procuros API.
Click on a log entry to see a detailed description and the exact JSON data that was exchanged, which is extremely helpful for debugging.
For "Data Issue" logs, you have an Ignore Transaction button. Use this if you have manually resolved the issue and want to prevent the system from trying to process that specific transaction again.
Transaction Data Mapping
Here is the documentation for the data sent in outgoing transactions and received in incoming transactions.
➡️ Outgoing Transactions
This table details the data Odoo sends to Procuros.
Procuros Transaction Type | Odoo Model | Odoo Field | Procuros Field |
ORDER (Purchase Order) | purchase.order | name | content.header.orderIdentifier |
purchase.order | date_order | content.header.orderDate | |
purchase.order | currency_id.name | content.header.currency | |
purchase.order | date_planned | content.header.requestedDeliveryDate | |
purchase.order | partner_id.ref (Vendor) | content.header.supplier.identifiers[0].identifier (Domain: GS1) | |
purchase.order | company_id.partner_id.ref | content.header.billTo.identifiers[0].identifier (Domain: GS1) | |
purchase.order | picking_type_id.warehouse_id.partner_id.ref | content.header.shipTo.identifiers[0].identifier (Domain: GS1) | |
connector.configuration | external_identifier | content.header.buyer.identifiers[0].identifier (Domain: GS1) | |
purchase.order.line | product_id.barcode | content.items[].identifiers[0].identifier (Domain: GS1) | |
purchase.order.line | Line index (loop counter) | content.items[].lineNumber | |
purchase.order.line | product_qty | content.items[].quantity | |
purchase.order.line | product_id.is_deposit_product | content.items[].isDepositItem | |
purchase.order.line | product_uom.unit_type | content.items[].unitOfMeasure | |
purchase.order.line | name | content.items[].description | |
purchase.order.line | date_planned | content.items[].requestedDeliveryDate | |
purchase.order.line | price_unit | content.items[].unitPrice | |
SHIPPING_NOTICE (Delivery) | stock.picking | partner_id.name | content.header.buyer.name |
stock.picking | partner_id.ref | content.header.buyer.identifiers[0].identifier (Domain: GS1) | |
stock.picking | partner_id.city | content.header.buyer.postalAddress.city | |
stock.picking | partner_id.country_id.code | content.header.buyer.postalAddress.countryCode | |
stock.picking | partner_id.name | content.header.buyer.postalAddress.name | |
stock.picking | partner_id.zip | content.header.buyer.postalAddress.postalCode | |
stock.picking | partner_id.street | content.header.buyer.postalAddress.street | |
stock.picking | sale_id.partner_shipping_id.ref | content.header.shipTo.identifiers[0].identifier (Domain: GS1) | |
stock.picking | sale_id.partner_invoice_id.ref | content.header.billTo.identifiers[0].identifier (Domain: GS1) | |
stock.picking | name | content.header.shippingNoticeIdentifier | |
stock.picking | date_done or scheduled_date | content.header.shippingNoticeDate | |
stock.picking | sale_id.commitment_date or scheduled_date | content.header.requestedDeliveryDate | |
stock.picking | scheduled_date | content.header.expectedDeliveryDate | |
stock.picking | sale_id.order_identifier or sale_id.client_order_ref or sale_id.name | content.header.orderIdentifier | |
stock.picking | sale_id.date_order | content.header.orderDate | |
stock.picking | carrier_id.name | content.header.carrier | |
stock.picking | carrier_tracking_ref | content.header.trackingNumber | |
connector.configuration | name | content.header.supplier.name | |
connector.configuration | external_identifier | content.header.supplier.identifiers[0].identifier (Domain: GS1) | |
stock.move.line | result_package_id.name | content.transportUnits[].unitIdentifier | |
stock.move.line | result_package_id.package_type_id.unit_type | content.transportUnits[].unitType | |
stock.move.line | Line index (loop counter) | content.transportUnits[].items[].lineNumber | |
stock.move.line | move_id.sale_line_id.order_line_number | content.transportUnits[].items[].orderLineNumber | |
stock.move.line | product_id.barcode | content.transportUnits[].items[].identifiers[0].identifier (Domain: GS1) | |
stock.move.line | product_id.is_deposit_product | content.transportUnits[].items[].isDepositItem | |
stock.move.line | move_id.sale_line_id.product_uom_qty or move_id.product_uom_qty | content.transportUnits[].items[].orderedQuantity | |
stock.move.line | quantity (summed by product) | content.transportUnits[].items[].shippedQuantity | |
stock.move.line | move_id.name | content.transportUnits[].items[].description | |
stock.move.line | lot_id.name | content.transportUnits[].items[].batches[].batchIdentifier | |
stock.move.line | lot_id.expiration_date | content.transportUnits[].items[].batches[].expirationDate | |
stock.move.line | quantity (per lot) | content.transportUnits[].items[].batches[].quantity | |
INVOICE (Customer Invoice) | account.move | partner_id.name | content.header.buyer.name |
account.move | partner_id.ref | content.header.buyer.identifiers[0].identifier (Domain: GS1) | |
account.move | partner_id.city | content.header.buyer.postalAddress.city | |
account.move | partner_id.country_id.code | content.header.buyer.postalAddress.countryCode | |
account.move | partner_id.name | content.header.buyer.postalAddress.name | |
account.move | partner_id.zip | content.header.buyer.postalAddress.postalCode | |
account.move | partner_id.street | content.header.buyer.postalAddress.street | |
account.move | partner_shipping_id.ref | content.header.shipTo.identifiers[0].identifier (Domain: GS1) | |
account.move | currency_id.name | content.header.currency | |
account.move | name | content.header.invoiceIdentifier | |
account.move | invoice_date | content.header.invoiceDate | |
account.move | sale_id.picking_ids[0].name (via get_delivery_order) | content.header.shippingNoticeIdentifier | |
account.move | sale_id.picking_ids[0].date_done or scheduled_date | content.header.shippingNoticeDate | |
account.move | sale_id.order_identifier or sale_id.client_order_ref or sale_id.name | content.header.orderIdentifier | |
account.move | sale_id.date_order | content.header.orderDate | |
account.move | sale_id.payment_term_id (Calculated days/percentage) | content.header.paymentTerms[] | |
connector.configuration | name | content.header.supplier.name | |
connector.configuration | external_identifier | content.header.supplier.identifiers[0].identifier (Domain: GS1) | |
account.move.line | Line index (loop counter) | content.items[].lineNumber | |
account.move.line | product_id.barcode | content.items[].identifiers[0].identifier (Domain: GS1) | |
account.move.line | product_id.is_deposit_product | content.items[].isDepositItem | |
account.move.line | quantity | content.items[].quantity | |
account.move.line | price_subtotal / quantity | content.items[].unitPrice | |
account.move.line | name | content.items[].description | |
account.move.line | tax_ids[0] (Calculated amount) | content.items[].tax.amount | |
account.move.line | tax_ids[0].amount | content.items[].tax.percentage | |
account.move.line | discount | content.items[].modificationGroups[].modifications[].percentage (Type: ALLOWANCE, Reason: DISCOUNT) | |
account.move | amount_tax | content.summary.tax.total | |
account.move | amount_untaxed | content.summary.subtotalAmount, content.summary.netAmount | |
account.move | amount_total | content.summary.grossAmount | |
account.move | amount_residual | content.summary.dueAmount | |
CREDIT_NOTE (Customer CN) | account.move | (Same as INVOICE for buyer, shipTo, supplier, currency, order, shipping) | |
account.move | name | content.header.creditNoteIdentifier | |
account.move | invoice_date | content.header.creditNoteDate | |
account.move | reversed_entry_id.name | content.header.invoiceIdentifier | |
account.move | reversed_entry_id.invoice_date | content.header.invoiceDate | |
account.move | cn_type (from context) | content.header.type | |
account.move | ref (Parsed reason) | content.header.reason | |
account.move.line | (Same as INVOICE for items) | content.items[] | |
account.move | (Same as INVOICE for summary) | content.summary |
⬅️ Incoming Transactions
This table details the data Procuros sends to Odoo.
Procuros Transaction Type | Odoo Model | Odoo Field | Procuros Field |
ORDER (Sales Order) | sale.order | procuros_transaction_id | procurosTransactionId |
sale.order | procuros_connector_id | connector.configuration (self) | |
sale.order | date_order | content.header.orderDate | |
sale.order | commitment_date | content.header.requestedDeliveryDate | |
sale.order | order_identifier | content.header.orderIdentifier | |
sale.order | partner_id (Searched by ref) | content.header.buyer.identifiers[].identifier (Domain: GS1) | |
sale.order | partner_shipping_id (Searched by ref) | content.header.shipTo.identifiers[].identifier (Domain: GS1) | |
sale.order | partner_invoice_id (Searched by ref) | content.header.billTo.identifiers[].identifier (Domain: GS1) | |
sale.order | user_id | connector.configuration.salesperson_id | |
sale.order | team_id | connector.configuration.salesteam_id | |
sale.order | company_id | connector.configuration.company_id | |
sale.order | payment_term_id | res.partner.property_payment_term_id or connector.configuration.payment_term_id | |
sale.order.line | order_line_number | content.items[].lineNumber | |
sale.order.line | product_uom_qty | content.items[].quantity | |
sale.order.line | name | content.items[].description | |
sale.order.line | product_id (Searched by barcode) | content.items[].identifiers[].identifier (Domain: GS1) | |
sale.order.line | product_uom (Searched by unit_type) | content.items[].unitOfMeasure | |
INVOICE (Vendor Bill) | account.move | procuros_transaction_id | procurosTransactionId |
account.move | procuros_connector_id | connector.configuration (self) | |
account.move | partner_id (Searched by ref) | content.header.supplier.identifiers[].identifier (Domain: GS1) | |
account.move | name | content.header.invoiceIdentifier | |
account.move | invoice_date | content.header.invoiceDate | |
account.move | currency_id (Searched by name) | content.header.currency | |
account.move | purchase_id (Searched by name) | content.header.orderIdentifier | |
account.move | invoice_payment_term_id (Searched) | content.header.paymentTerms or purchase.order.payment_term_id or connector.configuration.payment_term_id | |
account.move | move_type | (Hardcoded: 'in_invoice') | |
account.move | procuros_inc_transaction_status | (Hardcoded: 'Processed') | |
account.move.line | name | content.items[].description | |
account.move.line | quantity | content.items[].quantity | |
account.move.line | price_unit | content.items[].unitPrice | |
account.move.line | product_id (Searched by barcode) | content.items[].identifiers[].identifier (Domain: GS1) | |
account.move.line | purchase_line_id | (Matched from purchase_id and product_id) | |
account.move.line | tax_ids | (From purchase_line_id.taxes_id) | |
account.move.line | discount | content.items[].modificationGroups[].modifications[].percentage (Type: ALLOWANCE, Reason: DISCOUNT) | |
CREDIT_NOTE (Vendor CN) | account.move.reversal (Wizard) | date | content.header.creditNoteDate |
account.move.reversal (Wizard) | reason | content.header.reason | |
account.move.reversal (Wizard) | journal_id | (From original invoice) | |
account.move.reversal (Wizard) | move_ids | (Original invoice, searched by content.header.invoiceIdentifier) | |
account.move.reversal (Wizard) | company_id | (From original invoice) | |
account.move (Created) | procuros_transaction_id | procurosTransactionId | |
account.move (Created) | procuros_connector_id | connector.configuration (self) | |
account.move (Created) | procuros_inc_transaction_status | (Hardcoded: 'Processed') | |
account.move.line (Updated) | name | content.items[].description | |
account.move.line (Updated) | quantity | content.items[].quantity | |
account.move.line (Updated) | price_unit | content.items[].unitPrice | |
SHIPPING_NOTICE (Receipt) | stock.picking | procuros_transaction_id | procurosTransactionId |
stock.picking | procuros_connector_id | connector.configuration (self) | |
stock.picking | carrier_id (Searched by name) | content.header.carrier | |
stock.picking | carrier_tracking_ref | content.header.trackingNumber | |
stock.picking | procuros_inc_transaction_status | (Hardcoded: 'Processed') | |
stock.move (Updated/Created) | product_uom_qty | content.transportUnits[].items[].shippedQuantity | |
ORDER_RESPONSE | purchase.order | (Searched by name) | content.header.orderIdentifier |
(Confirm/Cancel/Change) | purchase.order | state | (Action: button_confirm or button_cancel) |
purchase.order.line | product_qty | content.items[].confirmedQuantity | |
purchase.order | payment_term_id (Validated against) | content.header.paymentTerms |