Global-e
Introduction
Global-e is a cross-border e-commerce platform that enables online retailers to sell internationally with ease. The platform provides a comprehensive solution for global e-commerce, handling various aspects of international sales, including:
- Localization (Multi-Currency and Pricing, Language, Payment Options)
- Logistics and Shipping (Shipping Solutions, Customs and Duties)
- Customer Experience (Localized Checkout, Returns Management)
This connector integrates the Global-e functionalities in Odoo in Coordination with Shopify.
Configuration
Since this connector is related to Shopify, there is a new tab within the Shopify Integration Settings for the user Configure Global-e:
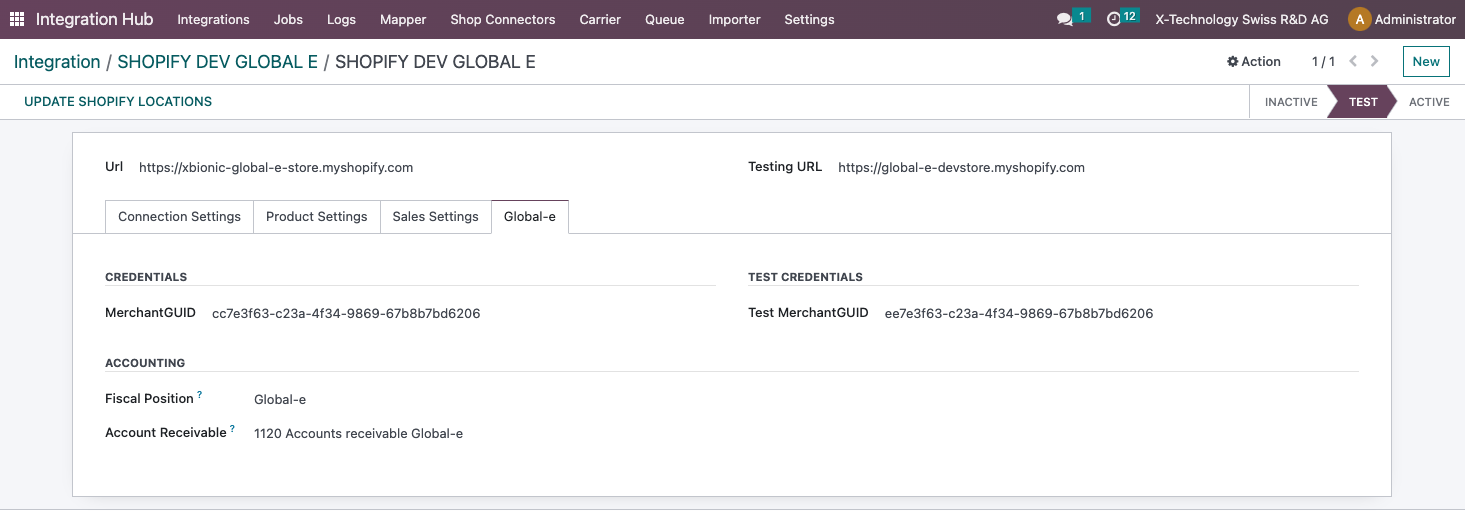
The user needs to configure the following parameters:
- MerchantGUID -> Global-e instance unique identifier (used for returns)
- Fiscal Position
- Account Receivable -> To be applied to the journal entries
The connector doesn't need to be activated, it is triggered based on the "Global-e Order" boolean described below.
Dependencies:
- Shopify Connector
- Debbyline WMS Integration
Orders
In the Global-e portal the user can specify what markets should be handled by Global-e and what markets should be tackled by the company. When an end customer places an order in a country which is specified as a Global-e market, the order is processed in Shopify by Global-e and in the end the tag "Globale::Approved" is placed on the shopify order.
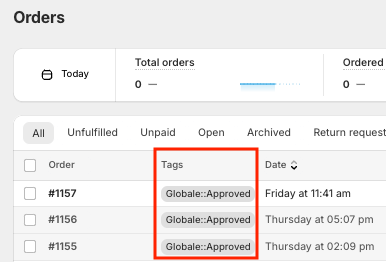
Based on this tag when the order is imported, Odoo sets the value of the new field "Global-e Order" to True and applies the following conditions:
- Imported in the shop currency (not in the currency the customer used)
- No shipping, fees or duties
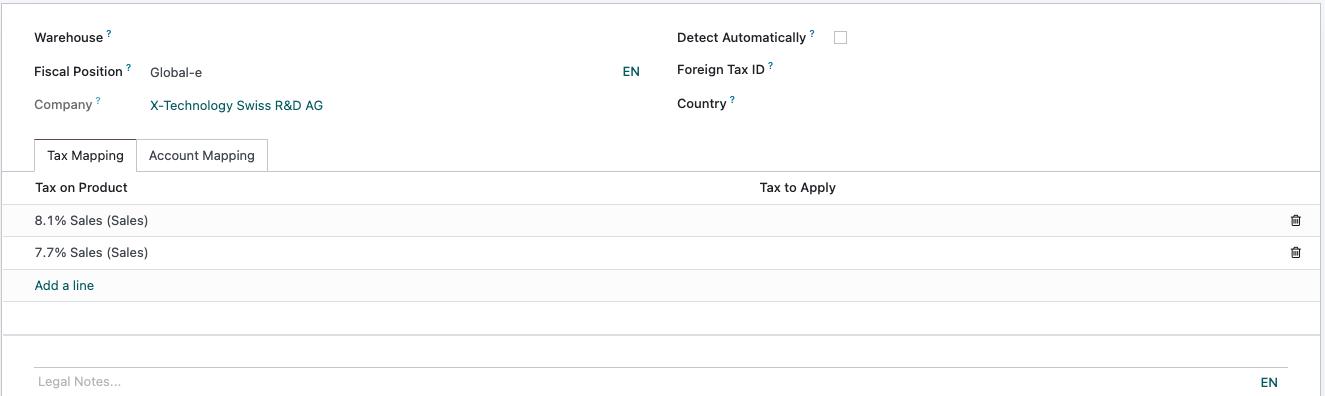
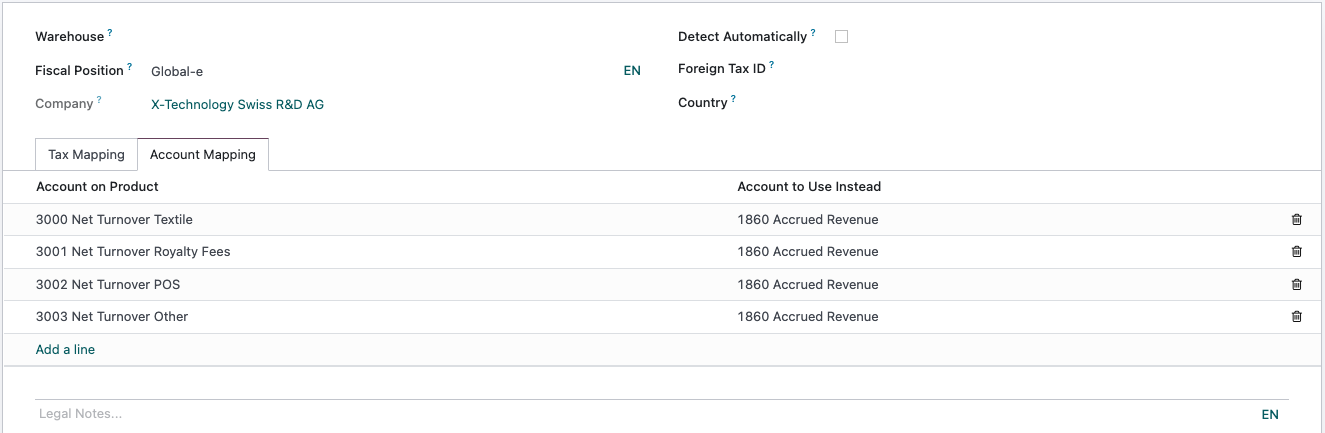
By applying the Fiscal Position below the order:
- Contains no tax.
- Accounts for accounting all replaced by an Accrued Revenue Account.
By applying the automated action below, a specific journal is applied to all Global-e invoices and credit notes:
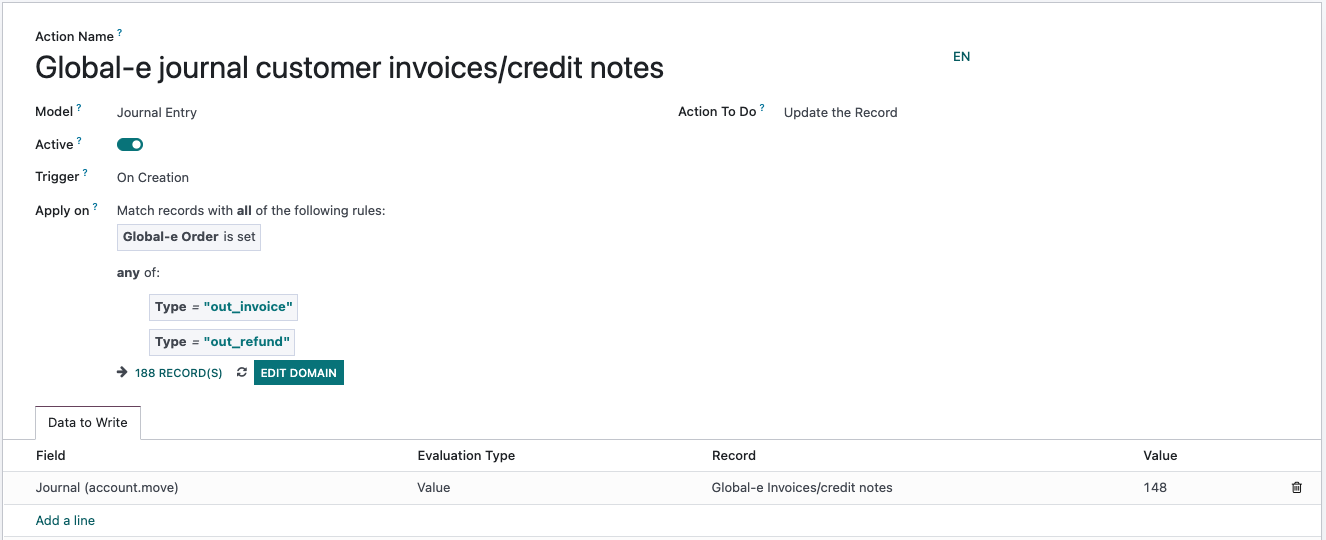
See Financial Process section for more information.
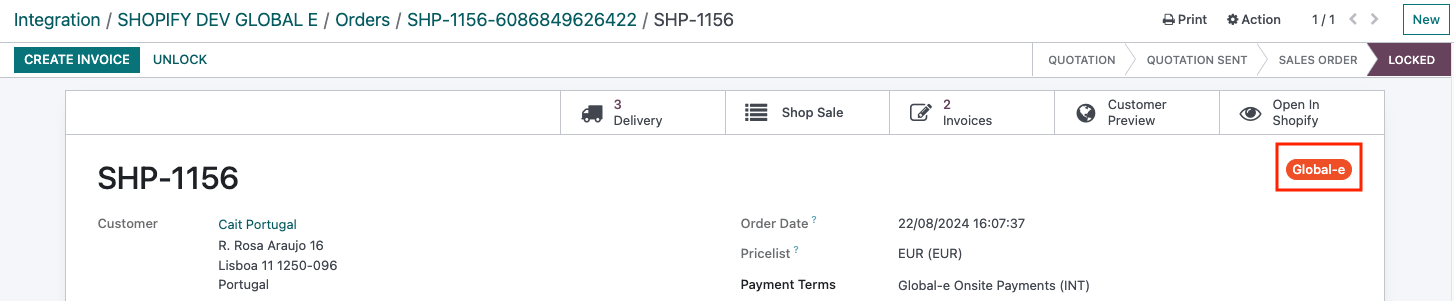
When an order is for Global-e, the pill/banner below is shown:
Fulfilment
Normally Shopify orders are automatically updated if the settings are configured correctly in the Shopify integration, however, for Global-e orders the fulfillment is not pushed to Shopify from Odoo. Global-e is integrated with Debbyline and they push the information to Shopify with additional required documents (for customs, etc) when the x540 (picking) is validated.
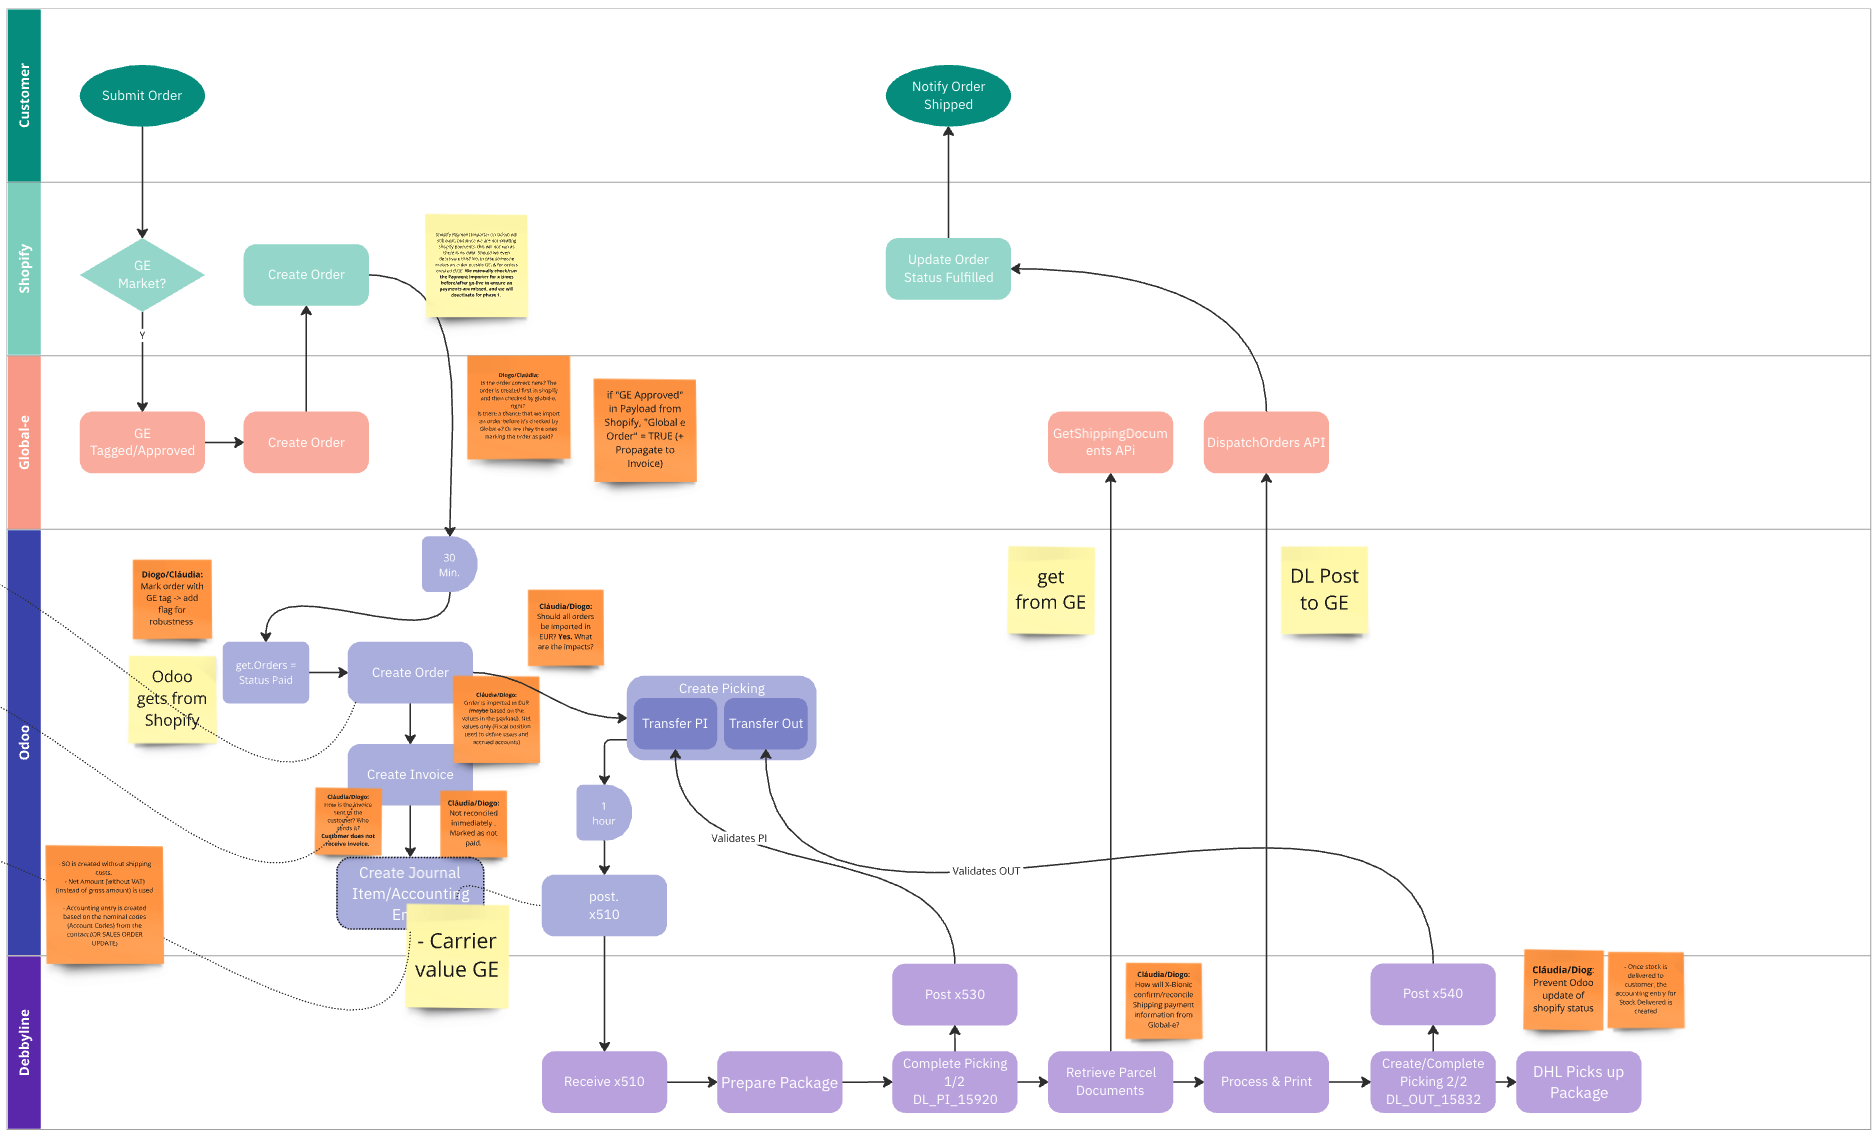
Carrier
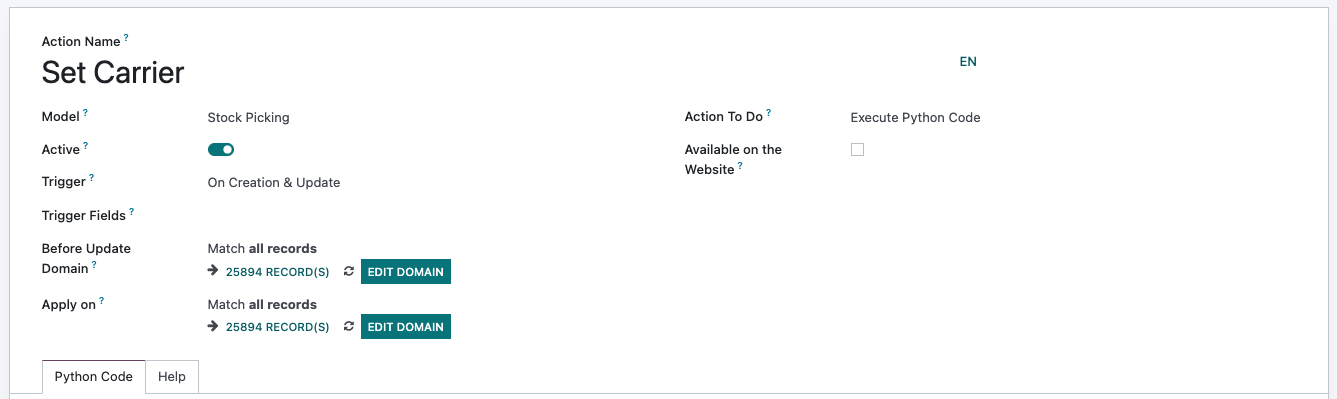
The carrier on orders is set based on some conditions. For Global-e orders the Carrier needs to be "GE", therefore, there is an automated action which takes care of that task:
# Available variables:
# - env: Odoo Environment on which the action is triggered
# - model: Odoo Model of the record on which the action is triggered; is a void recordset
# - record: record on which the action is triggered; may be void
# - records: recordset of all records on which the action is triggered in multi-mode; may be void
# - time, datetime, dateutil, timezone: useful Python libraries
# - float_compare: Odoo function to compare floats based on specific precisions
# - log: log(message, level='info'): logging function to record debug information in ir.logging table
# - UserError: Warning Exception to use with raise
# - Command: x2Many commands namespace
# To return an action, assign: action = {...}
# Change the carrier name below
b2b_carrier_name = "CARRIER"
b2c_carrier_name = "GSP_000"
global_carrier_name = "GE"
def get_delivery_carrier_ids(env):
"""
Retrieve delivery carrier records
based on predefined carrier names.
:param env: Odoo environment object
:return: Dictionary containing the carrier records
"""
delivery_carrier_obj = env["delivery.carrier"]
carrier_names = [b2b_carrier_name, b2c_carrier_name, global_carrier_name]
carrier_ids = {
carrier.name: carrier
for carrier in delivery_carrier_obj.search([("name", "in", carrier_names)])
}
# Validate that all carriers are found
missing_carriers = []
for name in carrier_names:
if name not in carrier_ids:
missing_carriers.append(name)
if missing_carriers:
error = f"Carrier not found with name(s): {', '.join(missing_carriers)}"
raise UserError(error) # noqa
return carrier_ids
def set_carrier_id_for_pickings(env, picking_ids):
"""
Set the carrier ID for pickings based on specific conditions.
:param env: Odoo environment object
:param picking_ids: List of stock.picking records
"""
carrier_ids = get_delivery_carrier_ids(env)
b2b_carrier_id = carrier_ids[b2b_carrier_name]
b2c_carrier_id = carrier_ids[b2c_carrier_name]
global_carrier_id = carrier_ids[global_carrier_name]
for picking in picking_ids:
sale_id = picking.sale_id
if sale_id:
# Condition for B2B carrier
if not sale_id.integration_type_id and all(
"amazon" not in tag.name.lower()
for tag in picking.partner_id.category_id
):
picking.write({"carrier_id": b2b_carrier_id.id})
continue
# Condition for Global-e carrier
if sale_id.is_global_e_order:
picking.write({"carrier_id": global_carrier_id.id})
continue
# Condition for B2C carrier
if "SHP" in picking.origin:
picking.write({"carrier_id": b2c_carrier_id.id})
set_carrier_id_for_pickings(env, records) # noqa
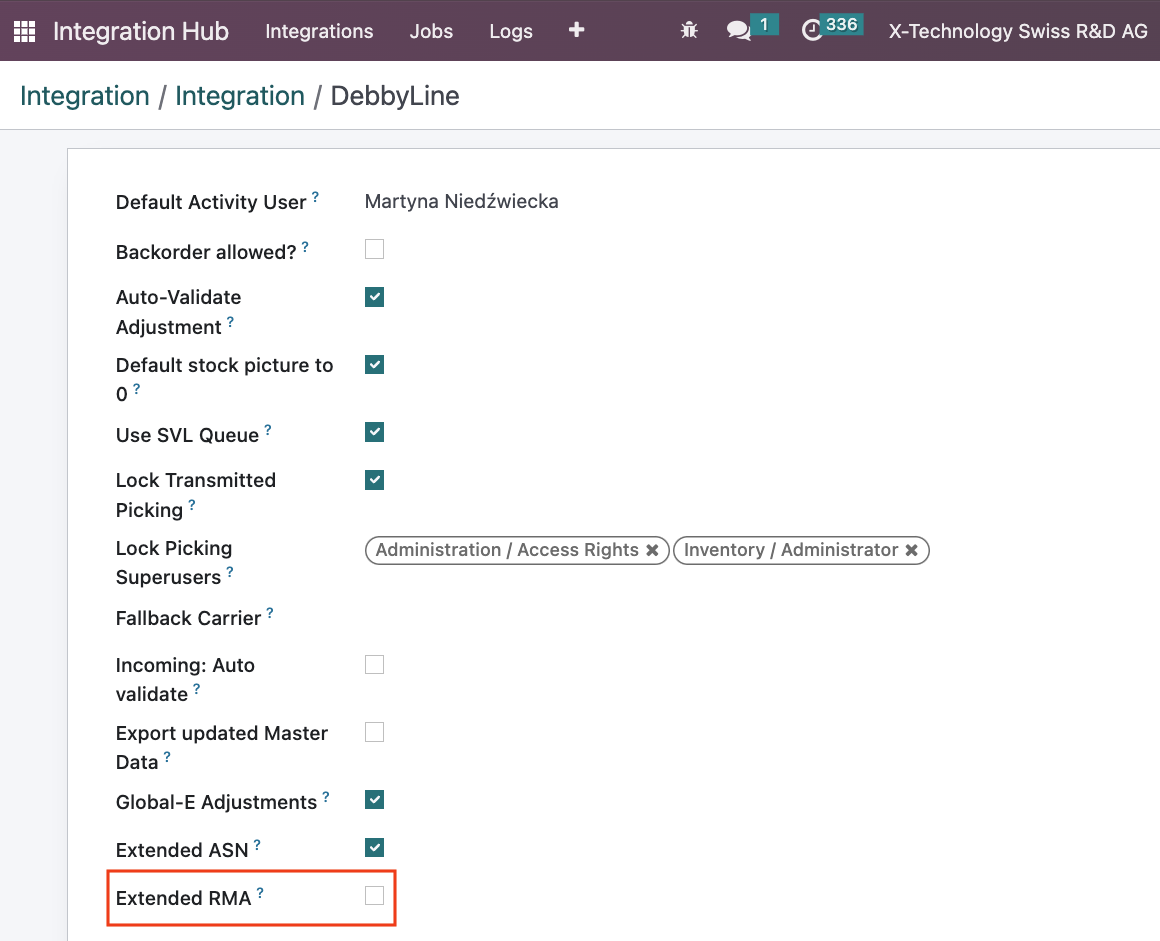
For the RMA number to be included in the x510 payloads, the following boolean needs to be activated in the wms integration settings:
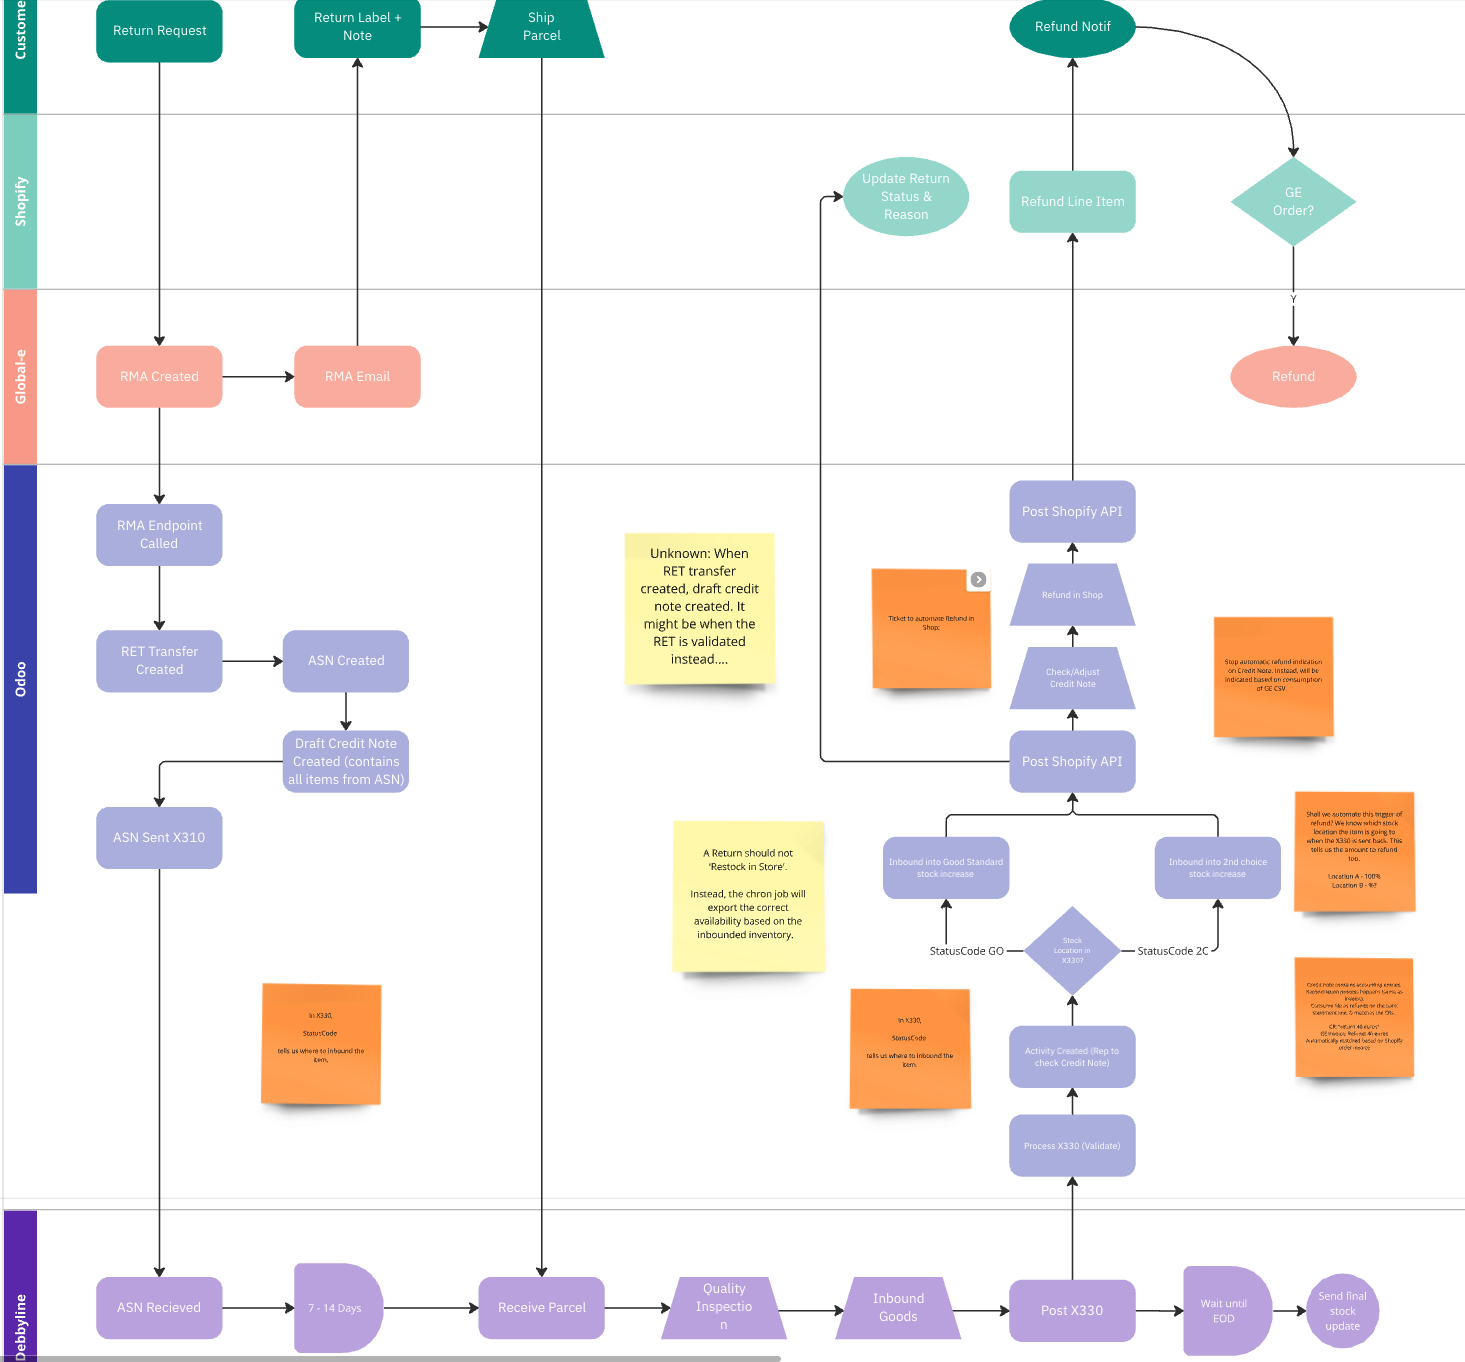
Returns
The returns are initiated by the end customer in the Global-e portal. When they validate it, this triggers the RMA endpoint in Odoo which ensures that returns are processed correctly. The return is then created by matching the MerchantGUID field (unique Global-e instance identifier) from Global-e with the appropriate Shopify instance and by taking the shopify order number.
RMA Endpoint
Setup
In order to use the endpoint it needs to be setup in the Shopify Integration. The only fields that need to be filled in are the "Global-e MerchantGUID" and the "Test Global-e MerchantGUID":
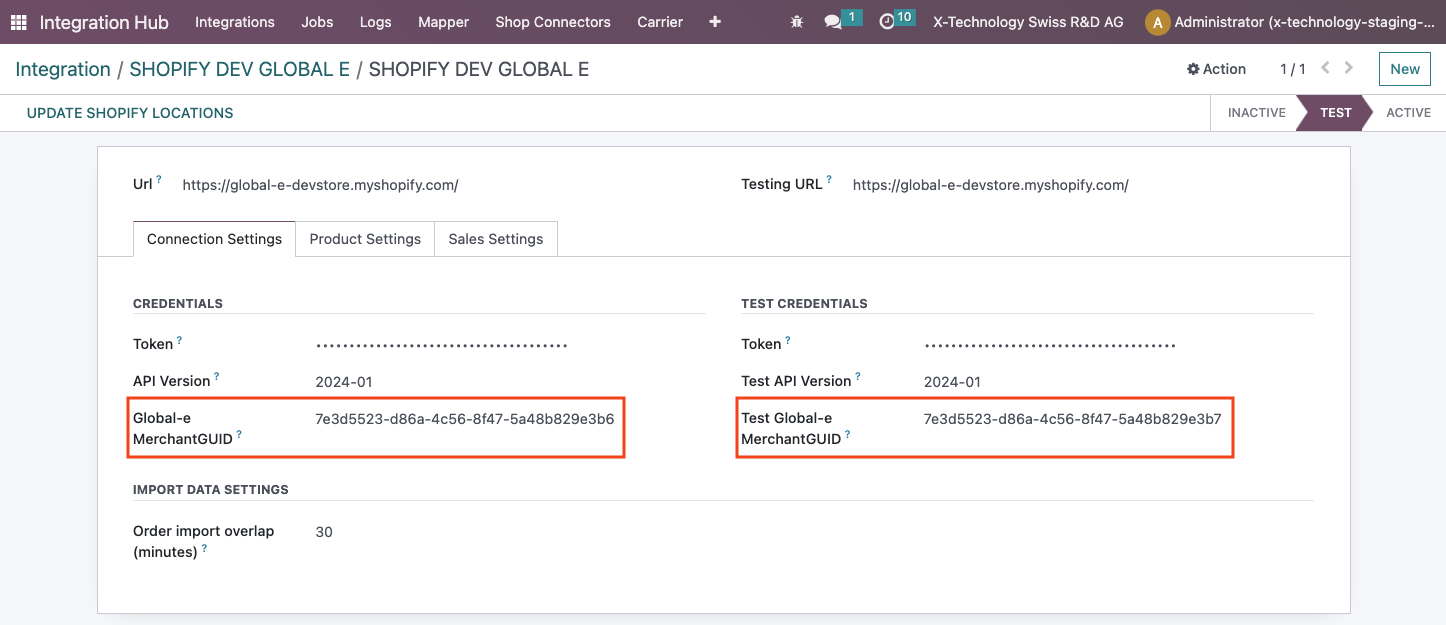
This value can be obtained form Global-e and is unique to each instance. It allows the system to know in which instance the return should be created, ensuring there are no issues with duplicate shopify sales order references and providing a new layer of safety.
The created endpoint has the following structure:
- https://xxxxxxxxxxx.odoo.com/globale/rma
Return Creation Flow
- Endpoint Activation:
- When the endpoint receives a return notification (RMA notification), it processes the return based on the MerchantGUID in the payload (Ex. MerchantGUID: 7e3d5523-d86a-4c56-8f47-5a48b829e3b7).
- The system checks if the MerchantGUID exists in the integration settings and whether it is in test or active mode.
- Validation and Processing:
- If the MerchantGUID from the payload matches the one in the integration settings, proceed to search for the order ID within the integration.
- The return is linked to the correct sales order and delivery picking, prioritising older pickings and minimising the number of open items.
- Return Creation:
- The return is created and linked to the appropriate sales order and picking.
Additional Features
- RMA Number (Return Merchandise Authorization) in the return transfer:
- The RMA number is the return identifier in Global-e.
- Add a read-only field named "RMA Number" to the return transfer, visible only for returns created through this process.
- Extended WMS:
- Add a checkbox in WMS (debbyline) Integration Settings for "Extended RMA."
- When enabled, the RMA number is included in the x310 payload (export Inbound transfers to the WMS partner).
- Authorization Header:
- The value is stored in the system parameters as
globale.token.
- The value is stored in the system parameters as
Testing the Endpoint
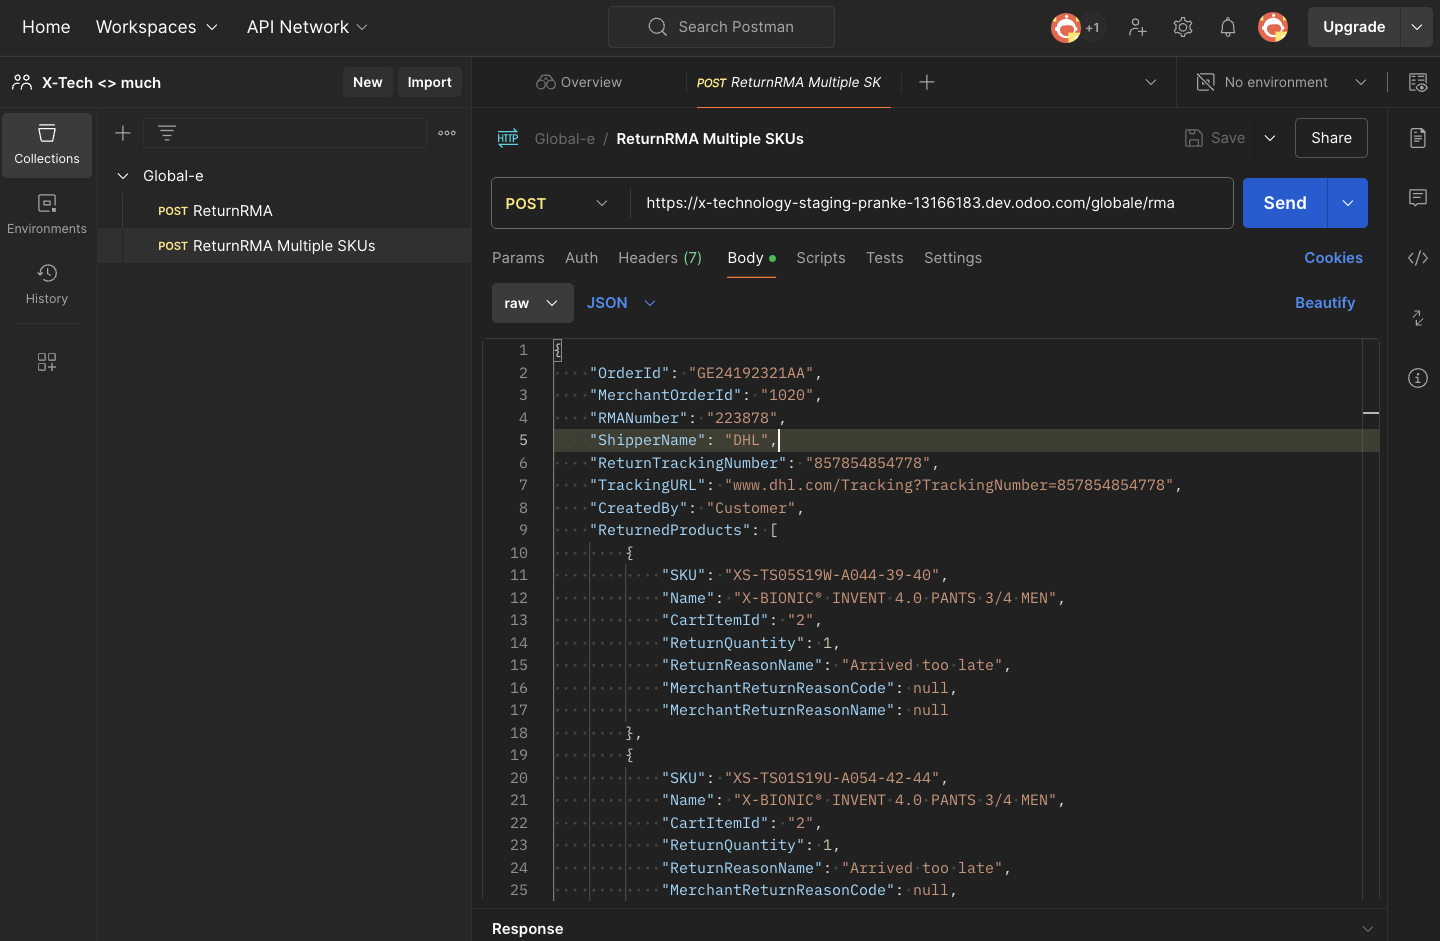
It is possible to test the RMA endpoint without accessing Global-e. To do so, a tool like postman needs to be used with a POST action To use it a payload like the one below needs to be used:
{
"OrderId": "GE24192321AA",
"MerchantOrderId": "1020",
"RMANumber": "223878",
"ShipperName": "DHL",
"ReturnTrackingNumber": "857854854778",
"TrackingURL": "www.dhl.com/Tracking?TrackingNumber=857854854778",
"CreatedBy": "Customer",
"ReturnedProducts": [
{
"SKU": "799976544545322",
"Name": "X-BIONIC® INVENT 4.0 PANTS 3/4 MEN",
"CartItemId": "2",
"ReturnQuantity": 1,
"ReturnReasonName": "Arrived too late",
"MerchantReturnReasonCode": null,
"MerchantReturnReasonName": null
},
{
"SKU": "78965656424442",
"Name": "X-BIONIC® INVENT 4.0 PANTS 3/4 MEN",
"CartItemId": "2",
"ReturnQuantity": 1,
"ReturnReasonName": "Arrived too late",
"MerchantReturnReasonCode": null,
"MerchantReturnReasonName": null
}
],
"MerchantGUID": "7e3d5523-d86a-4c56-8f47-5a48b829e3"
}
The fields that need to be changed are:
- MerchantOrderId -> Shopify Order Reference
- SKU -> Barcode
- ReturnQuantity -> Quantity to Return
- MerchantGUID -> Unique Global-e identifier
- Authorization Header -> Define the same as the
globale.token (see System Parameters) in the Headers section..
After modifying the payload, the message can be sent to the endpoint.
Processing the Return/Refund
When the return is imported to Odoo, a credit note is generated based on the amounts specified in the payload described above.
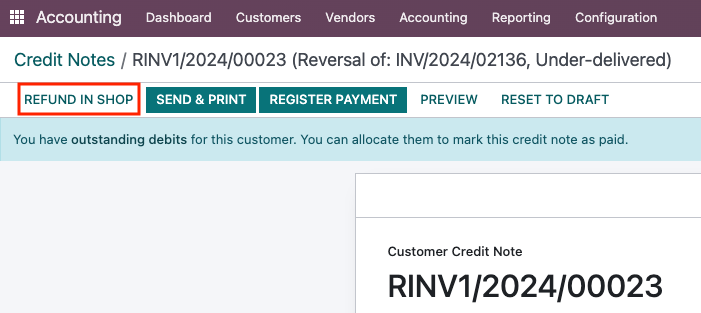
Afterwards, the warehouse provider processes the return and sends the x330 notification to validate the DL_RET. When the DL_RET is validated a user needs to open the credit note decide what to refund and click on "Refund in Shop" button. Since the DL_RET has been validated a cronjob checks it and updates the return status in Shopify to "Returned".
Since up to this moment Shopify doesn't have the information that something should be returned, the status doesn't go through the normal process of "Return Requested" -> "Return in Progress"-> "Returned" and is changed directly to "Returned".
In addition, Global-e uses the refund created by Odoo to decide what to actually refund -> the refund amount in Shopify and in the Global-e portal are going to be different due to the fact that , for example, shipping cost is not known when the order is placed.

Financial Process
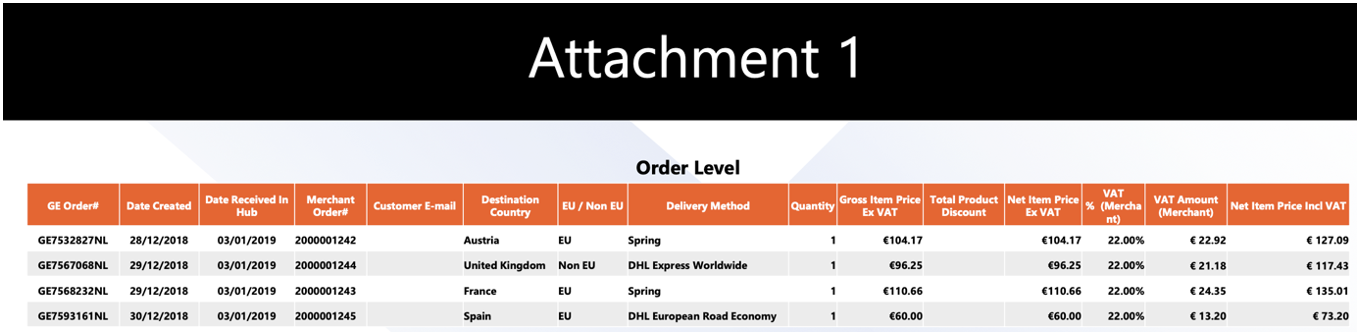
Global-e is the one handling payments from the end customer, returns, fees, duties and taxes and in the end provides the company with several reports. Therefore, there needs to be a way to understand what Global-e actually owes them to make sure everything is being considered.
For that reason, when the orders are imported in Odoo "internal" invoices are being created which use an accrued account specific for Global-e. In order to reconcile these transactions, attachment 1 (a list of all orders with the transaction values provided monthly by Global-e) is being used.
Order/invoice/credit note conditions:
- In the shop currency (EUR) (not in the currency the customer used)
- No shipping, fees or duties
- Contains no tax.
- Accounts for accounting all replaced by an Accrued Revenue Account.
- Specific Global-e journal
Invoice - Net Sales - Attachment 1
Attachment 1 which is a list of orders is integrated on the bank statement line and matched by the Shopify Sales Order.
The bank statement looks like this:
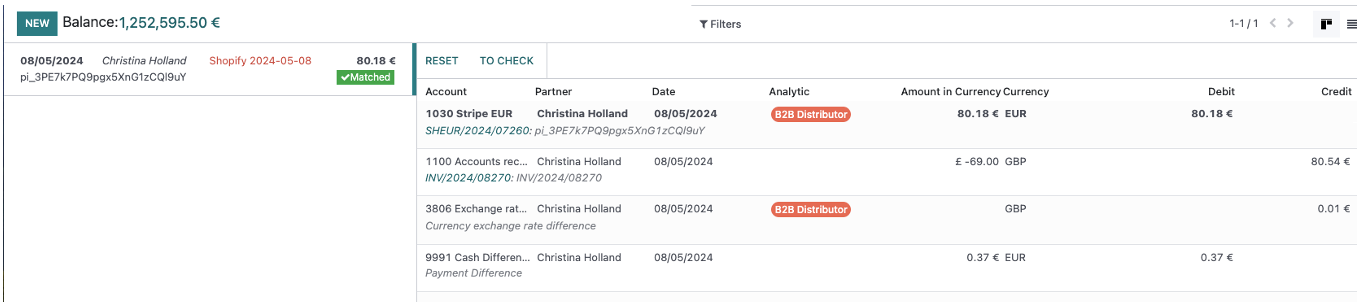
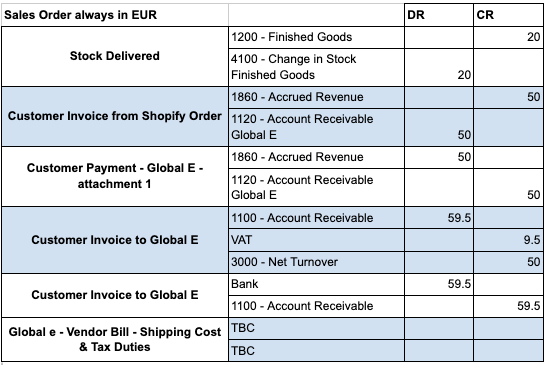
DR 1860 - Accrued Revenue = 57,50 EUR
CR 1120 - Accounts Receivable - Global e = 57,50 EUR
Global-e will also provide a vendor bill of the net sales which is used for ...
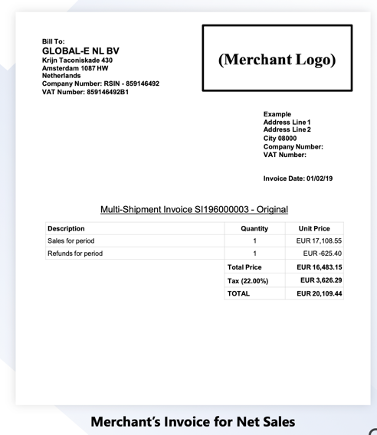
DR 1100 Accounts Receivable XXX EUR
CR 3000 Net turnover Textile XXX EUR
Global-e Payment
DR Bank. XXX EUR
CR 1100 Accounts Receivable XXX EUR
Returns - Attachment 2
Attachment 2 is a list of all returns which are used to reconcile the credit notes generated for the returns

Accounting Entries
Below you can find the accounts used for the process:
How to Reconcile Attachment 1 and 2
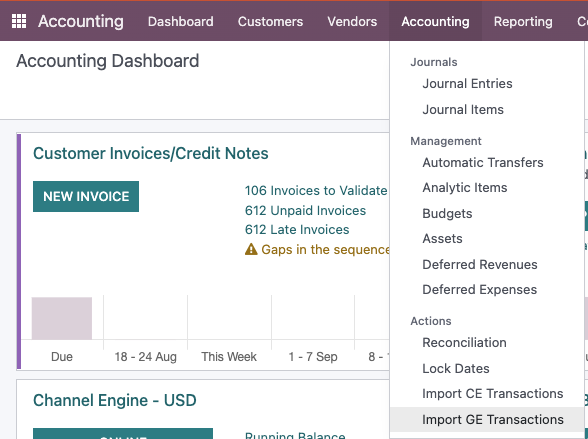
To create the reconciliation the user must receive the Global-e attachments (1 and 2) in the same excel file. Afterwards this file needs to be imported by going to Accounting / Accounting / Import GE Transactions:
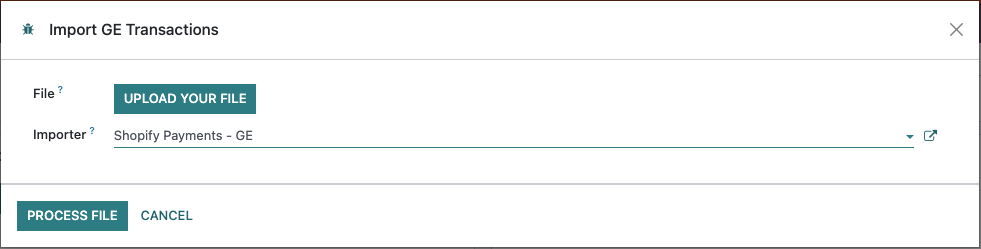
Then, upload the correct file and select the right importer:
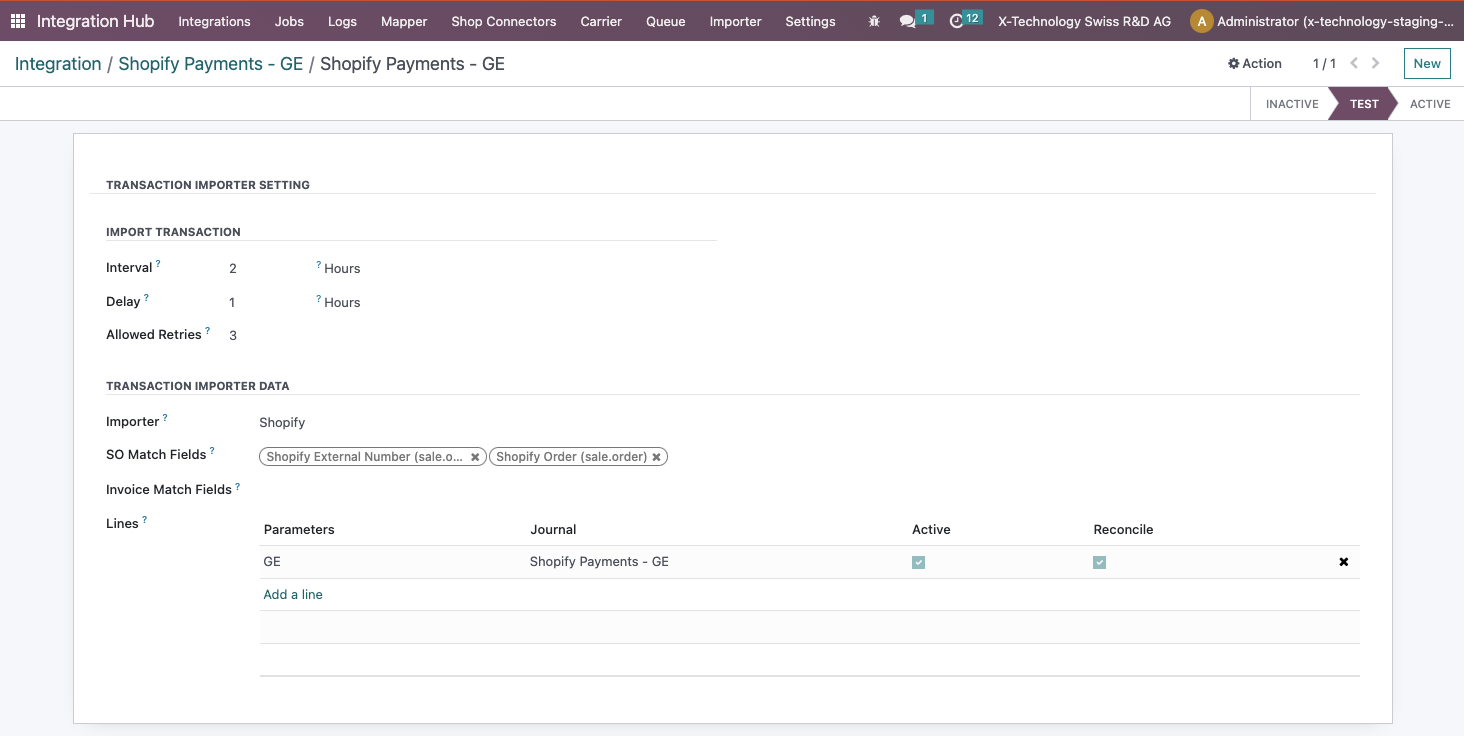
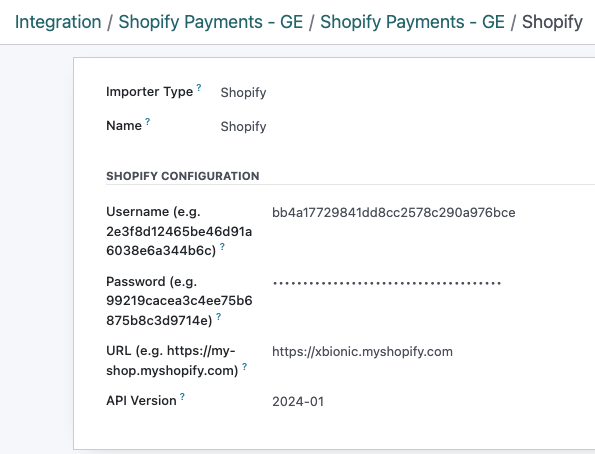
The importer is based on the transaction importer and needs to be configured as shown below:

Full Testing Workflow
- Create Shopify order with the tag "Globale::Approved".
- Import order.
- Fulfil order in Odoo.
- Fulfil order manually in Shopify (because updates are turned off for this case, Global-e does it).
- Create return using the RMA endpoint and the appropriate payload in Postman.
- Process Return (DL_RET) in Odoo
- Run return export cron job, click on "Return in Shop" or wait.
- Analyse credit note, validate it and click on "Refund in Shop".
Additional information
Orders and invoices are searchable by the Global-e Order field.